Schedule multiple events quickly.
|
Access the Auto Scheduler from the button on the Event Management List View screen. Then use the selection options to select the Industry or Group of Industries to schedule an event for. |
|
|
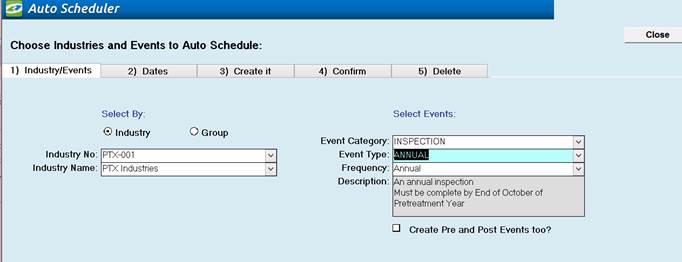
Select the type of event you want to schedule |
Use the drop down list under “Select Events” to choose the event you want to schedule for the selected Industry or Group of Industries. Then choose the event category and type. If the event has an auto schedule frequency it will be automatically added to the frequency selector. However, you can change it at this point. If the Event has Pre or Post events set up for it, <Create Pre and Post Events too> will be checked and those events will also be created. You may deselect creation of Pre and Post events but you cannot choose to add Pre and Post events unless they have already been set up in the <Event Type> utility table in Event Administration. (Pre / Post Events :)
This is a discontinued feature provided for backwards compatibility. Please
see the Pre / Post Configuration setting. Note! Each Event has an "Auto Schedule Frequency" which may be set in the Event Type of Event Administration. This frequency tells the system how often the event occurs. You can also set up Pre and Post events for each Event as well. |
|
Item |
Description |
|
Industries or Group |
Choose the Industry Group or Industry you would like to Auto schedule events for |
|
Event Category / Type |
Choose the type of events you would like to schedule. If you do not see the events you would like to schedule in the drop down box, go to the Event Administration Screen, click on the appropriate Event Type tab and add / modify an event type. |
|
Frequency |
How often is the event going to be generated? Frequencies will be auto populated with the Auto Scheduling Frequency from the event type selection. However, users can change the frequency at this point. To see where you can add an event type Auto Schedule Frequency, go to the Event Administration Screen. |
|
Create Pre and Post Events |
If the event type chosen has pre and post events associated with it, this check box will be filled in. This will automatically generate pre and post events for the chosen event type. |
These fields display previously chosen information and cannot be modified on this screen. To modify this information click on a tab to the left.
|
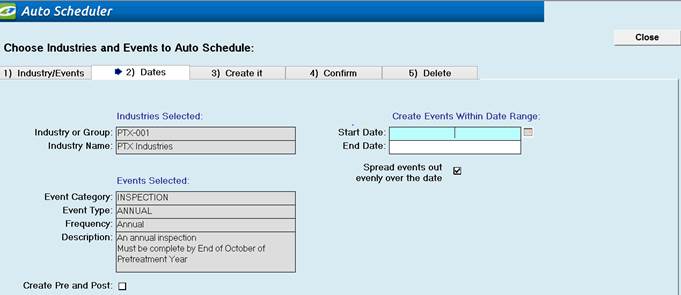
Choose a date range |
Click the <Dates> tab, and enter a Date Range to
schedule the event for. If you choose
<Spread out evenly over the date range>, all events will be spread out
proportionately over the date range, otherwise, all events for multiple
Haulers will be scheduled on the same date. |
|
Item |
Description |
|
Start Date |
Start Date for the Auto Scheduling Process. When do you want to schedule your first event? |
|
End Date |
End Date for Auto Scheduling Process. |
|
Spread Events out evenly over the date range |
Instead of scheduling all of the events on the same days, each event will be spread out throughout the frequency time period. This helps to alleviate overloading certain days of the month or week with too many events |
|
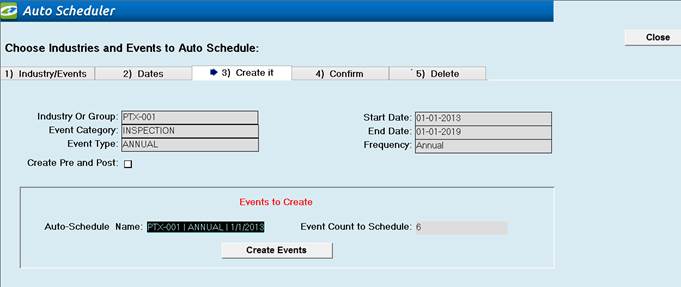
Schedule Summary and Name |
To make the schedule, click the <Create It> tab and it will display the number of events that are going to be created. An Auto Schedule Name will be automatically created for you or you may enter your own name. Click on the <Create it> button and all the events will be temporarily created and displayed on the <Confirm> Tab. |
|
Item |
Description |
|
Events To Create |
This Section of the software will identify how many events will be scheduled when you click on the Create Events Button. |
|
Auto-Schedule Name |
Auto populates with a suggested name that includes the Group or Industry, Event Type and Date. However, users can change this field. You may wish to note the Auto-Schedule name for future reference. |
|
Event Count to Schedule |
Number of events that are going to be created. Keep in mind the creation process is a two-step process and once the events are created they must be confirmed on the following screen |
|
Create
Events |
Use this button to create temporary events that can be confirmed within the “Confirm Tab”. Keep in mind that these events will only be temporarily created until confirmed. |
|
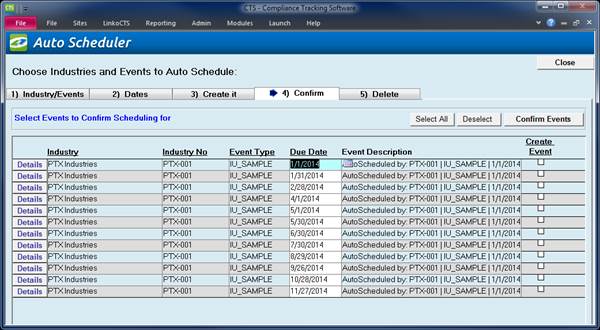
Confirm Tab |
This Section of the software will identify how many events will be scheduled when you click on the Create Events Button |
|
|
Use <Select All> and <Deselect All> buttons for rapid over-all changes or the ‘Create Event’ check box for individual events you wish to Confirm creation for. Click <Confirm Events> and all events marked as ‘Create Event’ will be created. |
|
Item |
Description |
|
Confirm
Events |
Choose the event that you would like to create, and then click on the Confirm Events button to create the events. Users can use the "select all" and "deselect all" to quickly choose events. |
|
Select
All |
This will select all events in the list and mark the Create Event check box as true |
|
Deselect
All |
This will deselect all events in the list and mark the Create Event check box as false |
|
Event Check Box |
Check the boxes for the events that you would like to create events for. Users can also use the Deselect All and Select All to rapidly Select all events |
|
Details |
Opens the details form to view or edit information regarding the events you are about to Confirm |
|
Due Date |
If the dates scheduled are not the dates you want, you can edit the date right here. |
|
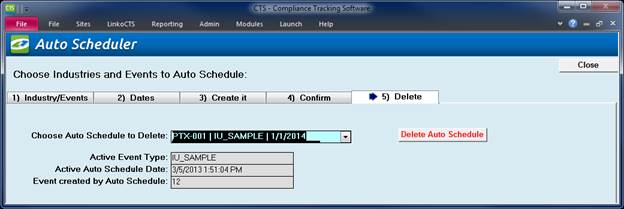
Delete A Schedule of Events |
Should you need to delete the scheduled events for any reason, click the <Delete> tab, select the Batch to delete from the drop-down list, and click the red <Delete Auto Schedule> button. |
|
Item |
Description |
|
Choose Auto Schedule to Delete |
Use the drop down list to choose the auto schedule event you would like to delete. Clicking on the Delete Auto Schedule button will delete any incomplete events that were created from that Auto Scheduling Event. Note: This Delete Function will not delete any event that has other events, such as Violations associated with it. The system will indicate how many events were deleted. This number may differ from the number created because of the reasons just indicated |
|
Active Event Type |
This is the type of event that was scheduled with the chosen Auto Schedule Item |
|
Active Auto Schedule Date |
The date the Auto Scheduling item was created |
|
Events Created by Auto Schedule |
Number of events that were created by the Auto Schedule item |