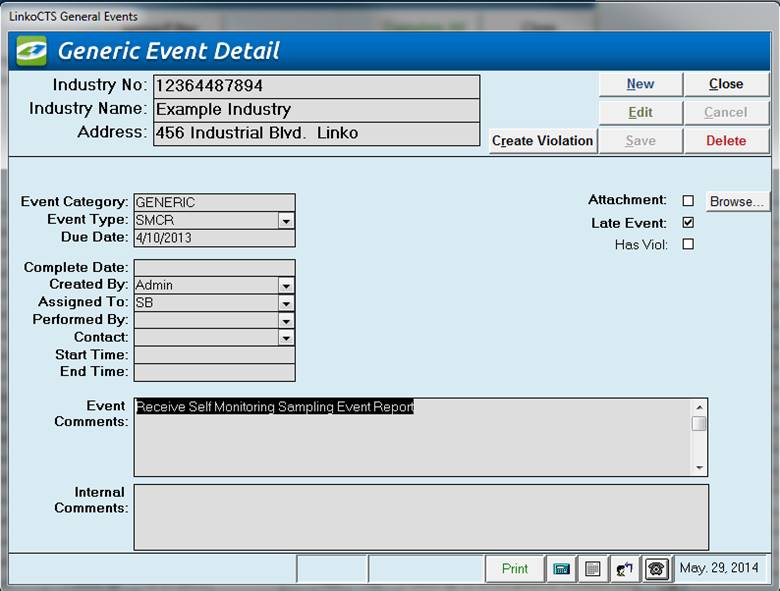
The General Event type has fields on it to record and display Generic information including Letter Printed events and Phone Call log events.
|
Event
Categories |
Different fields will
become available in Event Details depending on which category was chosen at
the Event
Pick Box. This Generic Details screen has fields on it to
record and display Generic (phone log and other) information. |
|
Selector |
Description |
|
Industry No |
ID of Industry whose
Events are being displayed below |
|
Industry Name |
Name of Industry whose
Events are being displayed below |
|
Address |
Address of the Industry. |
|
Buttons |
Action performed |
|
Opens Violation
Details page
allowing you to create a new Violation for this Event |
|
|
New |
Clears values and allows you to create a new
Event. While editing, the New, Edit,
Close, and Record Selector buttons will be disabled |
|
Edit |
Allows you to edit the displayed Event. While editing, the New, Edit, Close, and
Record Selector buttons will be disabled |
|
Save |
Saves the changes made to the Event. Only enabled while editing or creating an
entry |
|
Close |
Closes the screen |
|
Cancel |
Cancels any changes made to the Event. Only enabled
while editing or creating an entry |
|
Delete |
Deletes the Event. |
|
Record Selectors |
Standard Record Selectors allowing
you to move between displayed Events. |
|
Status Bar |
Reduced Status Bar allowing
you to view a Calendar, a Calculator, Contact Information, or create a new
Phone Log Event. |
|
Item |
Description |
|
Event Category |
Event Category selected
for this event. This field is not
editable, and will always display what was previously chosen |
|
Event Type |
This combo box lists all
possible types available for the selected Event Category. Use the Utility table "Event Types"
in Event
Administration to add
events that you want to track which are not already present in the Event
Types drop down list. |
|
Due Date |
The scheduled date for
the Sample to be taken |
|
Complete Date |
Date the event was done. |
|
Attachment |
Attach or view existing attachments by clicking the magnifying glass |
|
Browse… |
Opens a file browser
allowing you to select a file for association. Once selected, Click on this
button to open the file. |
|
Created By |
Person who created this
event. This can be used in bigger
systems to track who is scheduling the events to be completed |
|
Assigned to |
POTW person assigned to
complete the event. |
|
Performed by |
Person who completed the
event. |
|
Contact |
If interaction with the industry occurs, recording the contact will be useful information to have. This field is not limited to contacts associated with an industry. Simply type in the contact that you worked with |
|
Start and End Times |
Again, if interaction with the industry occurs, recording the time of interaction may be necessary information |
|
Late Event |
Whether or not this
Event is late. If the event is late,
this will be automatically filled in by the system |
|
Has Viol |
Whether or not there are
any violations associated with this Event.
If there are Violations, clicking this label will open the Violation screen
listing all of the violations for this single event |
|
Pre Notify/Post Notify? |
Pre Notify Events are
either created on an Event Type level in the Event
Administration Screen or on the fly
within any of the Events screens (Samples Included). Pre and Post Notify will automatically
generate events before and after the original events are due. For example, users can create a pre-event
to notify POTW personnel of an upcoming sample event. This can be used to prepare the sample
bottles and review the types of samples to take. This is a discontinued
feature provided for backwards compatibility. Please see the Pre / Post
Configuration setting. |
|
Event Comments |
Comments about this
Event. This field has an 8000 character limit. |
|
Internal Comments |
Internal Comments about
this Event. These do not display on
reports. This field has an 8000
character limit. |
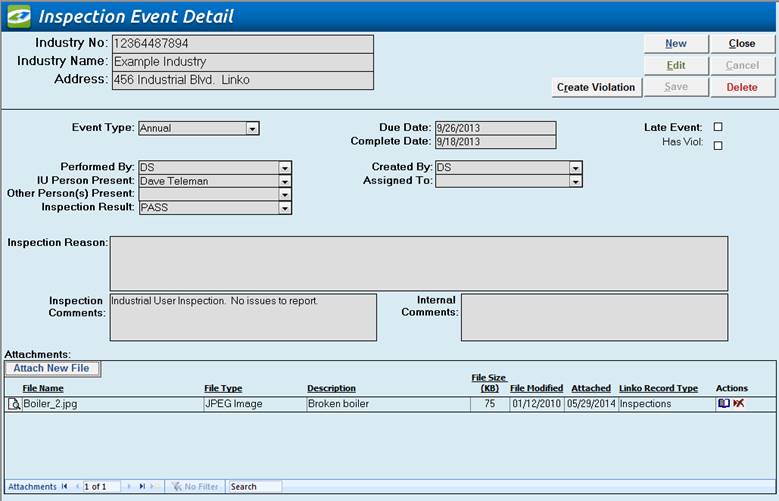
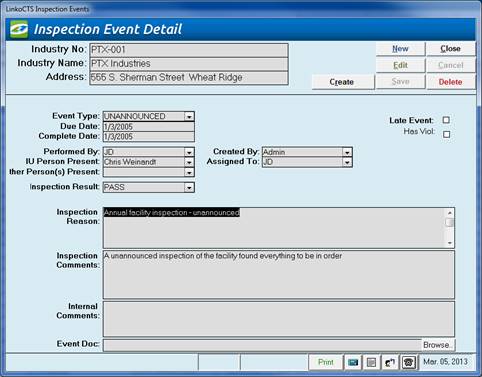
Use an Inspection Event for an Annual or surprise Industry inspection.
|
Event
Category Fields |
The Inspection Event Screen has fields that are
different than the fields that are displayed for the Generic Events Screen.
The Inspection Event does not include an Event Category, Contact, or event
Start Time or End Time fields. |
|
Item |
Description |
|
IU Person Present |
This field will show a
list of the contacts that exists for the Industry, but a user can type any
name that they want into the field. This identifies the Industry
representative who was present during the inspection. |
|
Other Person(s) Present |
This field allows the
user to add any other interested party who was present during the inspection.
Multiple persons’ names may be typed directly into the field. |
|
Inspection Result |
You can select the
result of the inspection from a list of typical results. When you want to add
additional results types to the list, simply type it in and tell Linko to add
it to the database when it asks. Or go to Event Administration under the Inspection Result Types tab and Add New. |
|
Inspection
Reason |
What was the reason for
the inspection? Planned, Suspicious
behavior, inspector feeling grumpy and so forth…. This field has a 254 character limit.
Note: Inspection Comments has an 8000
character limit, and Internal Comments has an 8000 character limit. |
|
Other
Person Present |
If you have more than 1
Inspector onsite during the inspection, their name or initials can be entered
here in this free form drop down area |
|
Attachments: |
Add new attachments or
view existing. See Using Attachments for more details |
Because Sample Events are of particular interest to our users they have their own section in the Users’ Guide. Click on Sample Events to view specific information on entering sample information.
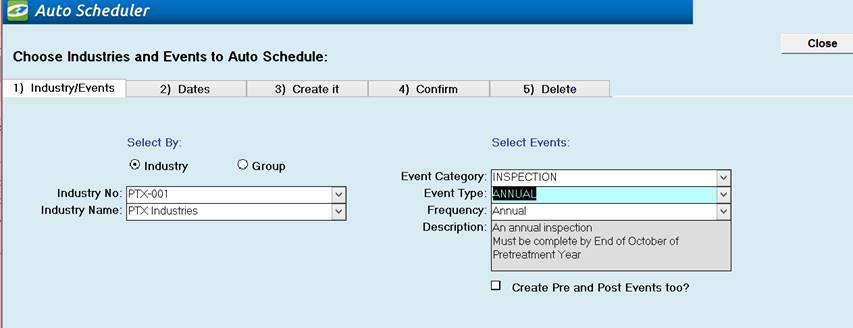
Schedule multiple events quickly.
|
Access the Auto Scheduler from the button on the Event Management List View screen. Then use the selection options to select the Industry or Group of Industries to schedule an event for. |
|
|
Select the type of event you want to schedule |
Use the drop down list under “Select Events” to choose the event you want to schedule for the selected Industry or Group of Industries. Then choose the event category and type. If the event has an auto schedule frequency it will be automatically added to the frequency selector. However, you can change it at this point. If the Event has Pre or Post events set up for it, <Create Pre and Post Events too> will be checked and those events will also be created. You may deselect creation of Pre and Post events but you cannot choose to add Pre and Post events unless they have already been set up in the <Event Type> utility table in Event Administration. (Pre / Post Events :)
This is a discontinued feature provided for backwards compatibility. Please
see the Pre
/ Post Configuration setting. Note! Each Event has an "Auto Schedule Frequency" which may be set in the Event Type of Event Administration. This frequency tells the system how often the event occurs. You can also set up Pre and Post events for each Event as well. |
|
Item |
Description |
|
Industries or Group |
Choose the Industry Group or Industry you would like to Auto schedule events for |
|
Event Category / Type |
Choose the type of events you would like to schedule. If you do not see the events you would like to schedule in the drop down box, go to the Event Administration Screen, click on the appropriate Event Type tab and add / modify an event type. |
|
Frequency |
How often is the event going to be generated? Frequencies will be auto populated with the Auto Scheduling Frequency from the event type selection. However, users can change the frequency at this point. To see where you can add an event type Auto Schedule Frequency, go to the Event Administration Screen. |
|
Create Pre and Post Events |
If the event type chosen has pre and post events associated with it, this check box will be filled in. This will automatically generate pre and post events for the chosen event type. |
These fields display previously chosen information and cannot be modified on this screen. To modify this information click on a tab to the left.
|
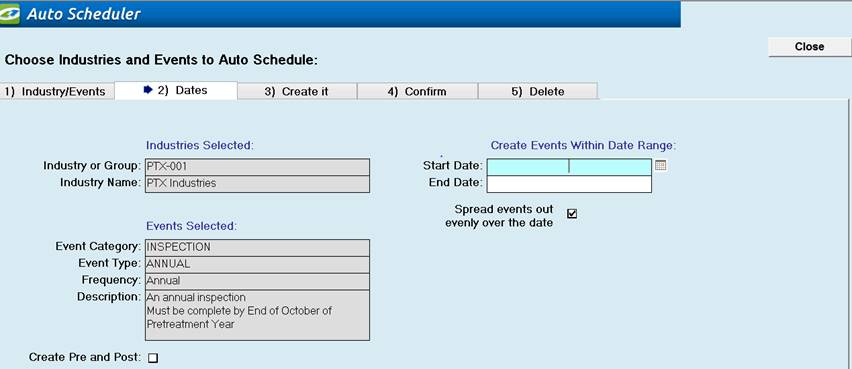
Choose a date range |
Click the <Dates> tab, and enter a Date Range to
schedule the event for. If you choose
<Spread out evenly over the date range>, all events will be spread out
proportionately over the date range, otherwise, all events for multiple
Haulers will be scheduled on the same date. |
|
Item |
Description |
|
Start Date |
Start Date for the Auto Scheduling Process. When do you want to schedule your first event? |
|
End Date |
End Date for Auto Scheduling Process. |
|
Spread Events out evenly over the date range |
Instead of scheduling all of the events on the same days, each event will be spread out throughout the frequency time period. This helps to alleviate overloading certain days of the month or week with too many events |
|
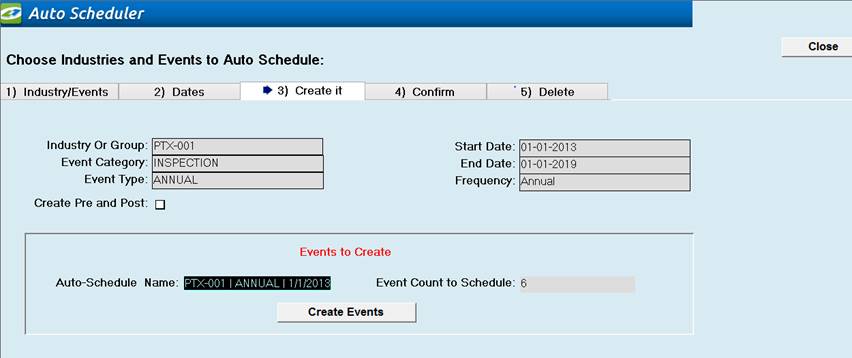
Schedule Summary and Name |
To make the schedule, click the <Create It> tab and it will display the number of events that are going to be created. An Auto Schedule Name will be automatically created for you or you may enter your own name. Click on the <Create it> button and all the events will be temporarily created and displayed on the <Confirm> Tab. |
|
Item |
Description |
|
Events To Create |
This Section of the software will identify how many events will be scheduled when you click on the Create Events Button. |
|
Auto-Schedule Name |
Auto populates with a suggested name that includes the Group or Industry, Event Type and Date. However, users can change this field. You may wish to note the Auto-Schedule name for future reference. |
|
Event Count to Schedule |
Number of events that are going to be created. Keep in mind the creation process is a two-step process and once the events are created they must be confirmed on the following screen |
|
Create
Events |
Use this button to create temporary events that can be confirmed within the “Confirm Tab”. Keep in mind that these events will only be temporarily created until confirmed. |
|
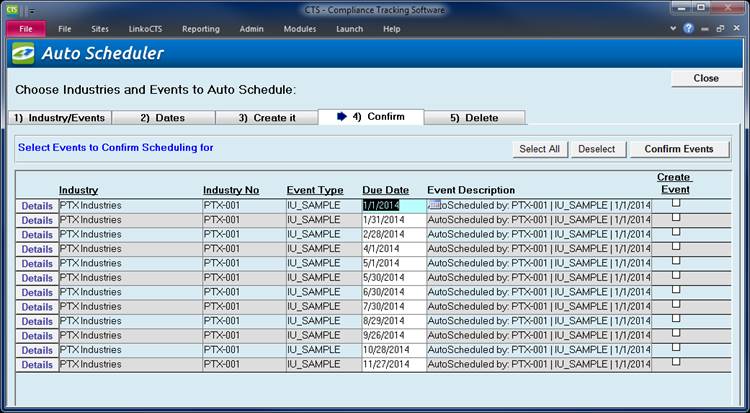
Confirm Tab |
This Section of the software will identify how many events will be scheduled when you click on the Create Events Button |
|
|
Use <Select All> and <Deselect All> buttons for rapid over-all changes or the ‘Create Event’ check box for individual events you wish to Confirm creation for. Click <Confirm Events> and all events marked as ‘Create Event’ will be created. |
|
Item |
Description |
|
Confirm
Events |
Choose the event that you would like to create, and then click on the Confirm Events button to create the events. Users can use the "select all" and "deselect all" to quickly choose events. |
|
Select
All |
This will select all events in the list and mark the Create Event check box as true |
|
Deselect
All |
This will deselect all events in the list and mark the Create Event check box as false |
|
Event Check Box |
Check the boxes for the events that you would like to create events for. Users can also use the Deselect All and Select All to rapidly Select all events |
|
Details |
Opens the details form to view or edit information regarding the events you are about to Confirm |
|
Due Date |
If the dates scheduled are not the dates you want, you can edit the date right here. |
|
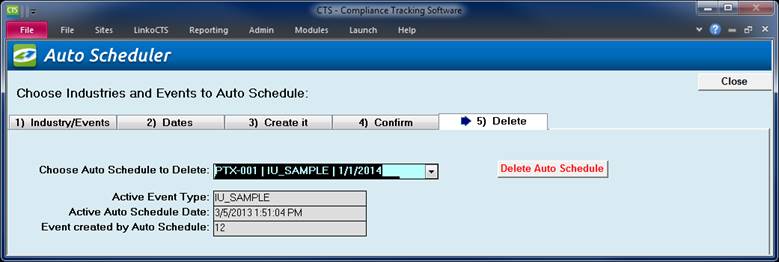
Delete A Schedule of Events |
Should you need to delete the scheduled events for any reason, click the <Delete> tab, select the Batch to delete from the drop-down list, and click the red <Delete Auto Schedule> button. |
|
Item |
Description |
|
Choose Auto Schedule to Delete |
Use the drop down list to choose the auto schedule event you would like to delete. Clicking on the Delete Auto Schedule button will delete any incomplete events that were created from that Auto Scheduling Event. Note: This Delete Function will not delete any event that has other events, such as Violations associated with it. The system will indicate how many events were deleted. This number may differ from the number created because of the reasons just indicated |
|
Active Event Type |
This is the type of event that was scheduled with the chosen Auto Schedule Item |
|
Active Auto Schedule Date |
The date the Auto Scheduling item was created |
|
Events Created by Auto Schedule |
Number of events that were created by the Auto Schedule item |
|
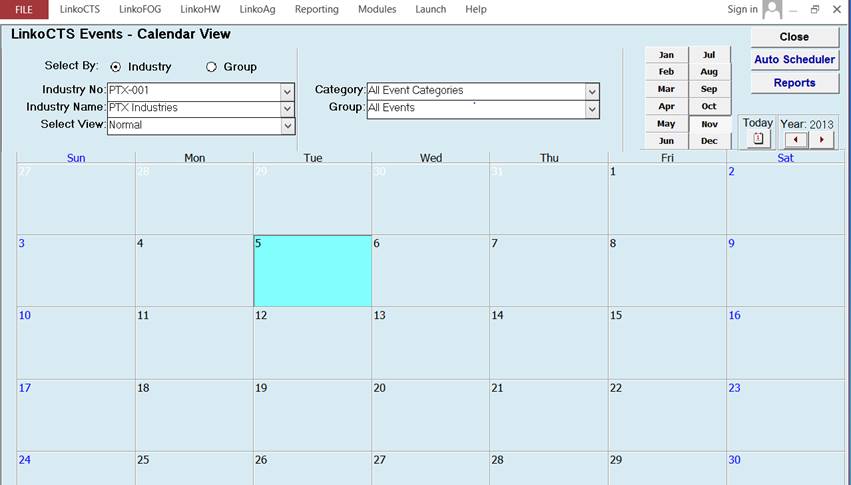
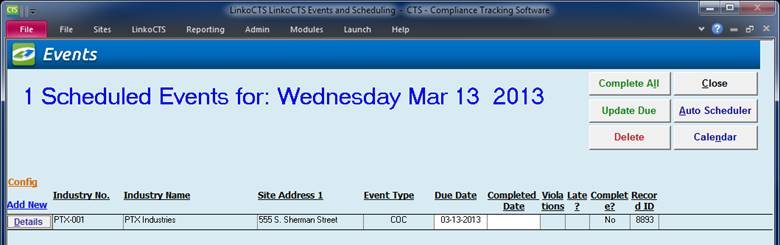
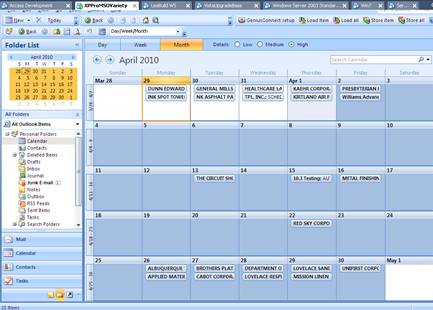
Calendar view |
View monthly events and the days they fall on, from the calendar view. To add a new event, modify or simply view all of the events for a given day, double click on the day of interest. A new screen is opened and all of these actions can be viewed and completed there. Calendar view defaults to the current month. |
|
Actual dates |
For each day of the month, a complete list of events that meet the filter criteria will be displayed. You can change the filter criteria by simply selecting different options in the drop down lists. |
|
View the events for one day |
To view more information about a particular day, double click on that date to see a list view of ALL the events scheduled that day. Each of these items has a Details button so you can view or edit each of the events Note: This feature does not limit you to see only the events that meet the filter criteria. |
|
|
The Calendar uses the
same type of filtering and grouping as the Event Management Screen, however,
groups cannot be created from this screen. Also a “full size” view, which is a larger view of the
calendar, is available in the Select View combo box. |
|
Buttons |
Action performed |
|
Close |
Closes the screen, returns to the Main Menu. |
|
Auto Scheduler |
Goes to the Auto Scheduler screen where events may be scheduled for multiple Industries at one time. |
|
Reports |
Opens the Reports page where a user can develop reports for a set of events. |
|
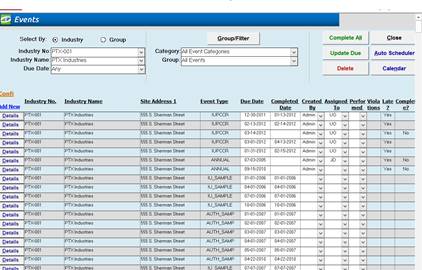
Filter Criteria |
Description |
|
Select by: |
Industry: Allows you to select, and work with events for a single Industry at a one time. Group: Allows you to select, and work with events for a whole group of Industries at the same time. These groups are created in the Industry Groups Section of the software. Any selection made here will be kept if you switch back to
the List View in Event Management via the “Select View”. And the selection
you had while in Event Management will be maintained when you switch from
there over to Calendar View. |
|
Industry No |
Displays the Industry number
of the Industry associated with the events displayed. Displayed only when using "Select by:
Industry" mode. |
|
Industry Name |
Displays the Industry name
of the Industry associated with the events displayed. Displayed only when using "Select by:
Industry" mode. |
|
Group |
Displays the Group name
of the Industries associated with the events displayed. Displayed only when using "Select by:
Group" mode. |
|
Select View |
Change from List or Full view. List View switches back to
the Event Management window. |
|
Category |
Choose the Category
Group for the events. Under all events
you can customize a group to contain more than one category. |
|
Type |
Choose the Event type group that you would like to filter on. |
|
Complete
All |
Allows you to add
the Completed date for every event on the screen at one time. |
|
Delete |
Delete an event. |
|
Close |
Closes the screen, returns to the Main Menu. |
|
Auto Schedule |
Goes to the Auto Scheduler screen where events may be
scheduled for multiple Industries at one time. |
|
Calendar |
Opens the Calendar view.
The default view is for the current month |
|
Add New |
Opens the Details screen in a format that is ready to
accept new events. |
|
Details |
Opens the Details Page for the Event. You can modify existing event records in
this screen. |
|
Item |
Description |
|
Displays the Industry Name associated with the events displayed. |
|
|
Event Category |
Category of event. Depending on which Category is chosen, different fields will be available to the user. |
|
Event Type |
The type of event. E.g. sampling, inspection, receive report, etc. Event types may be added to the list box via the Event Types of System Administration. |
|
Due Date |
The date that this event is due to be completed. This date is filtered on by the Quick View Due Date function. |
|
Completed Date |
The actual date that the event was completed. |
|
Created by |
User who created this event within the POTW. |
|
Performed By |
User who is scheduled to perform this event or User who has performed the event. |
|
Violation Exists |
Has a violation been created in association with this event? You can create a violation from any event from the event details screen. That violation is then associated or related to the event for the life of the event. |
|
Late |
Is this event late or was it completed late? If the event was completed late it will display a check. |
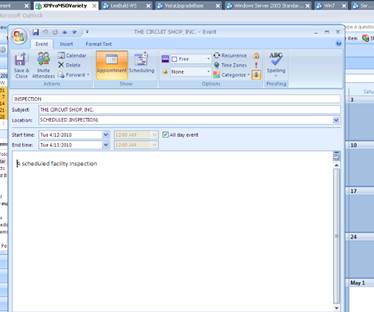
Events created in LinkoCTS (such as Samples, Inspections, Permit renewals, SMRs, and COC’s) can be imported into a calendar in MS Outlook. When you create Events in Linko they will be added to your Outlook calendar.
Outlook Calendar View contrasted to the same month in the Linko Events screen:
|
|
|
Events can be updated in Outlook. For example, in this Scheduled Inspection Event, additional information can be entered into the Inspection Comments field in Outlook, and at the next synchronization the additional comments will be imported into the Inspection Comments in the Inspection Event in Linko.
|
|
|
The reverse will also occur.
Using the Linko to
Outlook synchronization process:
Typical steps using a
new Inspection Event as an example:
1. From the Linko Main Menu, Choose Industries.
2. Select the Industry from the Industry No. or Industry Name selectors.
3. Click on the Events Tab for the Industry.
4. Under the Events Tab, click on the Add New selection.
5. Choose the Event Category “Inspection”.
6. Chose the appropriate event type for the Inspection (for example: “Annual”)
7. Fill in the DUE DATE and other fields as desired for the Inspection Event.
8. Click on SAVE to save the new Inspection Event.
9. Click on CLOSE to exit the Event Details screen.
10. At this point, the Inspection Event exists in Linko.
11. Open Outlook.
12. At the next scheduled synchronization, the Event will be updated to Outlook.
13. After the sync, you can view the Inspection Event in the “Linko Inspections” Calendar (your calendar name may differ depending upon your configuration.)
14. Choose whether you want to use the Day, Week, or Month views for the Calendar.
15. Open the Event by double-clicking on it in the Outlook Calendar.
16. If desired, change the Reminder time to an appropriate value. Events created in Linko default to NO reminder time.
17. Update the Start Time of the Event if desired. Changing the Start Time on the Inspection in Outlook allows you to Re-schedule it for a different date and time on your calendar in Outlook. This change will be reflected in Linko.
18. Revise the comments for the Inspection if desired. This change will be reflected in Linko at the next synchronization.
19. Your Outlook Calendar now displays the Scheduled Inspection Event and your changes.
20. When you have completed the Event, return to Linko and go to the Events Tab for the Industry. Enter the Details of the Event, and enter a Completed Date. You should always complete Events in Linko.
21. Note that Events can also be managed from the EVENTS section of the software.
Additional
considerations:
1. Outlook only shows the events that are NOT COMPLETE in Linko. When you complete an Event, it will drop out of the Outlook Calendar at the next synchronization.
2. Events deleted from Linko are deleted from Outlook. Deleting a calendar item from Outlook does NOT delete it from Linko.
3. Events must be created in Linko. When you schedule appointments in your Outlook Calendar, they will not show up in the Linko listing of events.
4. Linko created events are made with “All Day Event” Selected. If you unselect it and put in a date and time it changes into a 24 hour event over two days the next time that the synchronization runs.
5. You can create several calendars to sync with Linko. For example you could create a Sample calendar and an Inspection calendar. Users of the Linko SQL Express Version of the Software can sync with a max of 1 calendar. Users of the Linko Enterprise SQL version can sync with multiple calendars.
6. Outlook must be open and running to sync. Setting up a Linko specific calendar is recommended for tracking Linko events. This makes the process of synchronizing faster because the sync is only looking at Linko Outlook items and not your personal Outlook items.
7. If you have other users of Linko in your office that you want to share the calendar with, you will need Microsoft Exchange or some other third party web service. To use MS Exchange, work with your IT department to set up a shared calendar. Name the calendar Linko and verify it is available to all other staff. Add some calendar items to it and verify others can see what has been added and can change them as well.
8. The Outlook Synchronization Module must be purchased separately, and can only be used with the most recent Version of the Linko software. The Outlook Synchronization Module requires MS Outlook 2007 or greater.
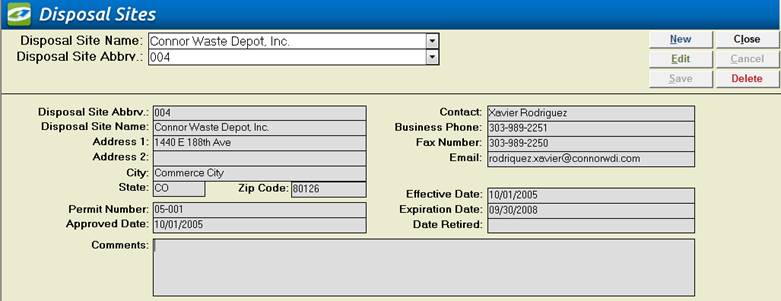
Identify which Disposal Sites in your area can accept Hauled Waste and even go so far as to permit them if needed. You can track details regarding a disposal site and even generate letters to them.
Available on the Menu Bar under File.
|
Letters and Reports |
Letters and Reports can be
generated from the Disposal Sites screen, all letters and all reports are for
all Disposal Sites. You cannot generate a letter or report for just
the currently selected Disposal Site. If you want to modify the letters and
reports for Disposal Site, they appear under the PERMITS category in Flexible
Reporter. |
|
Disposal Site Name |
Pull-down list of Disposal
Sites in the Database. Select the Disposal Site by Name and the information
will be displayed in the lower section. |
|
Disposal Site Abbrv. |
Pull-down list of the
abbreviations of Disposal Sites in the Database. Select the Disposal Site by
its abbreviation and the information will be displayed in the lower section. |
|
New |
Clears values and allows you to create a new Disposal Site. While editing, the New, Edit, Close, and Record Selector buttons will be disabled. |
|
Edit |
Allows you to edit the displayed Disposal Site. While editing, the New, Edit, Close, and Record Selector buttons will be disabled. |
|
Save |
Saves the changes made to the Disposal Site. |
|
Close |
Closes the screen. |
|
Cancel |
Cancels any changes made to the Disposal Site. |
|
Delete |
Deletes the Disposal Site. |
|
Disposal Site Name |
Pull-down list of Disposal Sites in the Database. Select the Disposal Site and the information will be displayed in the lower section. |
|
Disposal Site Abbrv. |
This value is needed for a Disposal Site to identify each site uniquely. The user can change the alphanumeric value but it must be unique. This is a required field. |
|
Address 1 / 2 |
Address lines for the Disposal Site. |
|
City, State, Zip |
Full Location of the Disposal Site. |
|
Permit Number |
If your POTW permits the Disposal Site, or if the Site is State certified, you can use the information most valuable for your program. This field provides flexibility in record keeping for the Disposal Site in your program. The
Permit Number is generated automatically when a new Disposal Site is created; the Permit No. field is updated to match the Site Abbrv.
when the Site Abbrv. field is edited. The user can easily change it as needed. If
you POTW program does not issue Waste Hauler Permits, simply let Linko fill
in this field with the Site Abbrv. This is a required field. |
|
Approved Date |
Your POTW or City may have a program to identify who is an approved Disposal Site and you can use this field to indicate when they were approved. |
|
Contact |
The personnel at the Site you would contact for business issues. |
|
Business Phone |
The Disposal Site Contact’s phone number. |
|
Fax Number |
The Disposal Site Contact’s Fax number. |
|
Email |
The Disposal Site Contact’s Email address. |
|
Effective Date |
What date the Disposal Site’s Permit became effective. |
|
Expiration Date |
When the Permit expires. |
|
Date Retired |
If you want to maintain information on a site that is no longer being used, or is not active anymore, you can indicate when it was retired from service. Entering a Retire Date will prevent the Disposal Site from being visible in drop down lists throughout the application. |
|
Comments |
Additional information about the facilities and functions at the Disposal Site. |