LinkoCTS has a number of common features used throughout the software.

Editable/Non-editable Fields: In the example above you will notice some “White” fields and some “Gray” Fields. This is not an accident. It is an indicator of what fields are currently modifiable. All White fields are in an editable state and all gray fields are locked.
Date Fields: Double Click on any date field to open a pop up Calendar date selector. Date fields can include times using Military 24 hour format. Times must be entered manually in the field and cannot be entered in using the double-click calendar.
Easy Sorting: In List View, screens clicking on any column headers that are underlined will instantly sort the data on the screen (first ascending, then descending) by that particular field.
Zoom Box: Any white or gray field that is underlined can be double-clicked to bring up an enlarged view screen, or show other details regarding that field.
If you are unable to access the video below, click here instead to launch it in your browser: Main Menu and Ribbon Bar
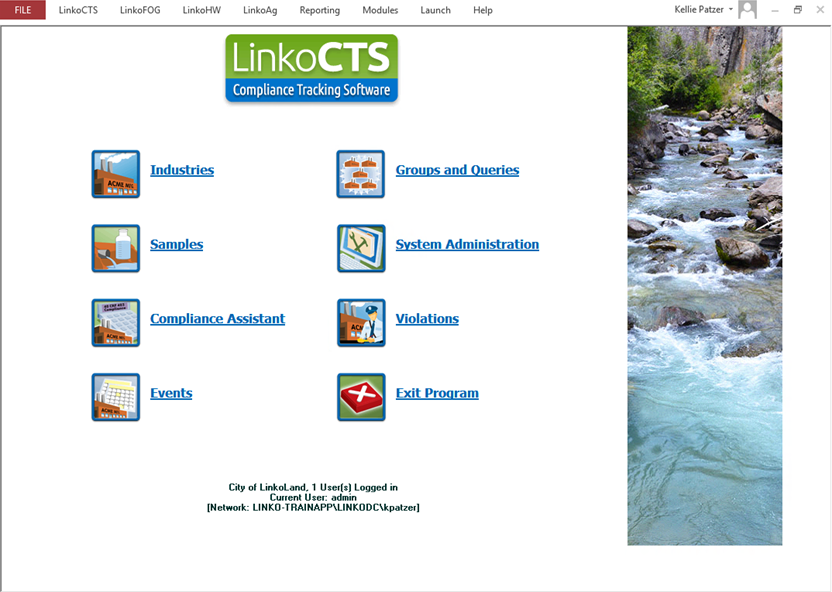
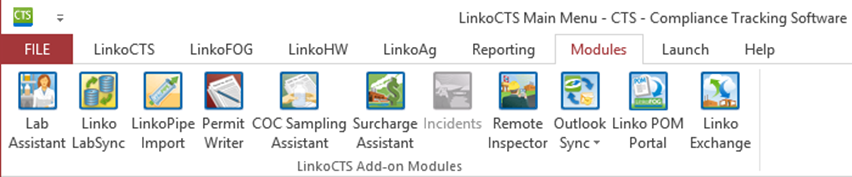
The Main Menu presents the functional sections of LinkoCTS. Click on an icon to open that section of the software.
|
Item |
Description |
|
Opens Industry Management window. |
|
|
Samples |
Opens Sample
Management window. |
|
Compliance
Assistant |
Opens Compliance Assistant window. |
|
Events |
Opens Event
Management window. |
|
Groups &
Queries |
Opens Industry Groups window. |
|
System
Administration |
Opens Administration
SwitchBoard window |
|
Violations |
Opens Violation Management window. |
|
Exit Program |
Exits LinkoCTS. |
If you are unable to access the video below, click here instead to launch it in your browser: Getting Help from Linko Support
|
|
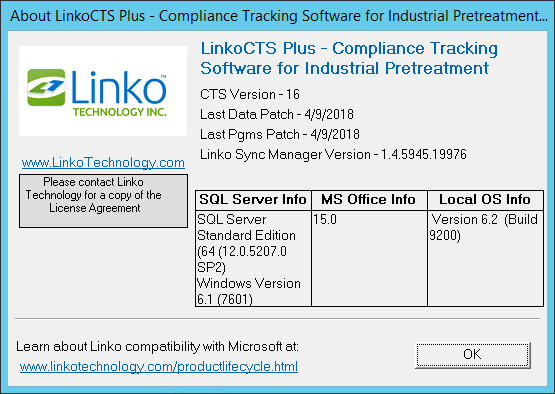
Click the “Help” selection in the Menu Toolbar at the top of the main screen and then select “About Linko Software”. This takes you to the following versioning screen, which provides the version of Linko Software, dates of updates, and server and workstation information.
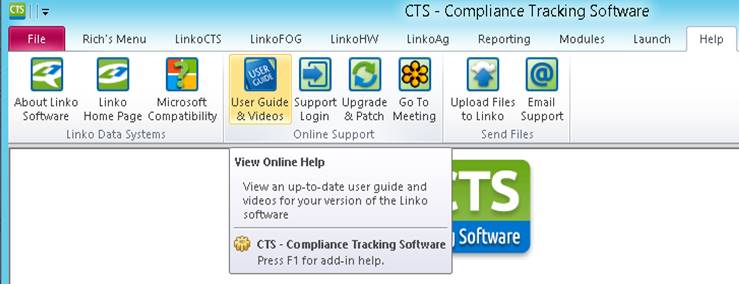
You can access this Online User Guide directly from the Linko Software by choosing “Help” and then choosing “User Guide and Videos.”
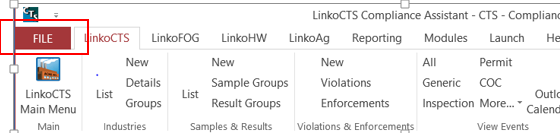
The Menu bar has more options than the Main Menu, and provides the ability to go from one section of the program to another without returning to the Main Menu. Some screens are only accessible via the Menu Bar. When you select one item from the selections, a list of options will appear. Selecting from the second list of options will open the selected screen.
The Main Menu Toolbar:
![]()
The LinkoCTS Menu Selections
Click on the LinkoCTS selection in the Main Menu Toolbar to open its list of options:

1. LinkoCTS Main Menu – From every screen in the software you can click on this choice and return directly to the Main Menu.
2. List / New / Details / Groups – The Industries section of the menu lets you open the Industry List View, create a new Industry, open the Industries screen to see the details of Industries, or open the Groups screen to analyze data for groups of Industries at one time.
3. List / New / Sample Groups / Result Groups – The Samples & Results section of the menu lets you open the Samples List View, create a new Sample, open the Sample or Result Groups to analyze a group of Industries and their Samples and Results based upon your selection criteria.
4. New / Violations / Enforcements – The Violations and Enforcements section of the menu lets you create a new Violation, open the Violations List View, or open the Enforcements List View. The Enforcements List View is only accessible via this menu.
5. View Events and Create Events – these two sections provide the ability to see a listing of the selected Event types, or to create a specific event type.
Depending on the configuration of your Linko software you may or may not see the selections in the Main Menu Toolbar for the LinkoFOG, LinkoHW and LinkoAG modules. These menu sections are covered in the appropriate online userguides for that module.

1. Review Compliance – This selection opens the Parameter Compliance tab of the Compliance Assistant section of the software so you can run calculations on discharge compliance and SNC.
2. Annual Summary – This opens the Annual Summary tab of the Compliance Assistant section of the software so you can generate a Year End Report.
3. Industrial Tracking – This opens the Industrial Tracking tab of the Compliance Assistant section of the software where you can produce a report on one industry and all of the samples and results that were taken for it, as opposed to just samples meant to be considered for SNC calculations.
There are a number of add-on modules that you can purchase to enhance the capabilities of your Linko Software. Feel free to contact the Sales Director for your region to discuss any of the listed tools.
One of the new features of this version is the ability to set up a menu to run external applications and make that customized menu available to just yourself (User Apps & Links) or to other users (Global Apps & Links).
Please see the Launch Menu Item in the System Admin section of this UserGuide for more information regarding configuration of this tool. When it has not been configured you will see only blank spaces in the different sections, waiting for you to set up your customizations.

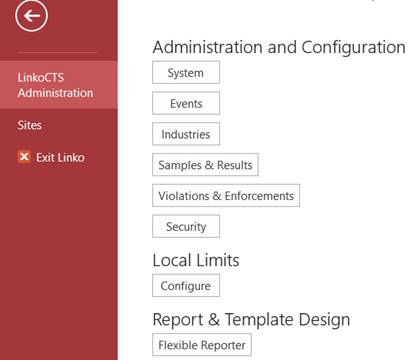
Clicking on FILE opens an alternate menu of tools for the Linko Software. These tools include System Administration, Local Limits, Flexible Reporter and Sites management. Please see those separate sections of this UserGuide for more information.
Opens the following:
If you are unable to access the video below, click here instead to launch it in your browser: List View vs Single Record View
Linko screens start with a “list view” or general view of the information you are viewing. From most “list view” screens you can access a button to display a more “detailed view” of the information you are currently viewing. This is what we will refer to in our software as “List View” and “Details View”.
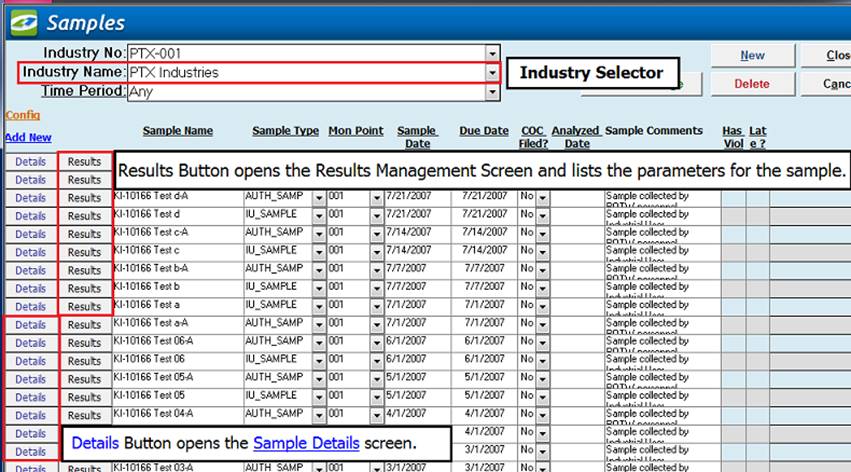
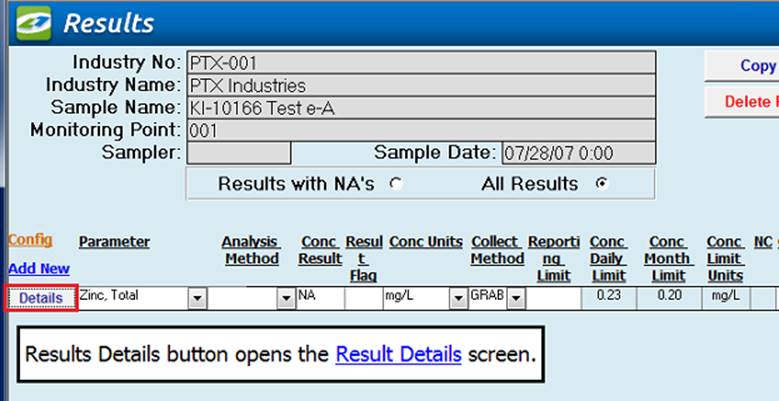
Add a new record by clicking on the Add New button. Editing records and more detailed viewing are done by clicking on the Details button.
Most “list view” screens can be customized by clicking on the Config hyperlink (seen above the Details Buttons and the Add New link). Data entry and modification can be done directly on the Samples, Results, Industry List view, and Events Management List View screens.
Throughout the software, whenever you have a drop down list to select an Industry, you will also see the address of the Industry. This makes it easier to distinguish Industries with the same name.
After adding Industry information you will be able to use the Industry Name or Industry Number drop down lists at the top of most screens to change the Industry information that you are viewing.
Samples, Events and Violations List View screens, as well as Compliance Assistant have a <custom> Date Range selector.
|
|
|

This Custom Date Range is a local configuration specific to each user or machine. Each user can select a different custom date range than other users of the software. This date range will be available for you to use on each list view screen until you change it.
To change the custom date range, select <custom> from the View Date drop-down list. While <custom> is displayed, double-click on the word <custom>. That opens the “Enter Custom Dates” range selector you see above. Enter your date range and then click Continue to have the dates applied to the screen you are viewing.
If you are unable to access the video below, click here instead to launch it in your browser: Image Assistant replaced with New Attachments Feature
|
|
The Linko Software provides you the ability to attach files to records in the software. You can attach any type of file you want including MS Word documents, Excel spreadsheets, PDF files, images and more.
When attaching files to a record, Linko will take a copy of that file and place it in its attachments repository and will use that as the File of Record. Others who use Linko can view or edit that file using the Linko software. Do not attach a file into Linko that other non-Linko software users need to view or edit. After attaching a file, take the original and archive it, move it to a place where others will not mistake it for the File of Record.
The ability to view and attach files exists in several different places in the software including on Details screens, List view screens and on the Attachments tab.
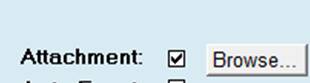
On the Details screens throughout the software, a check in the Attachment box indicates that at least one file is attached to that record. Clicking Browse… will open the Attachment Preview screen. When not checked, clicking Browse… will open the Select a File to Attach screen.
Details
screen example:
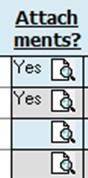
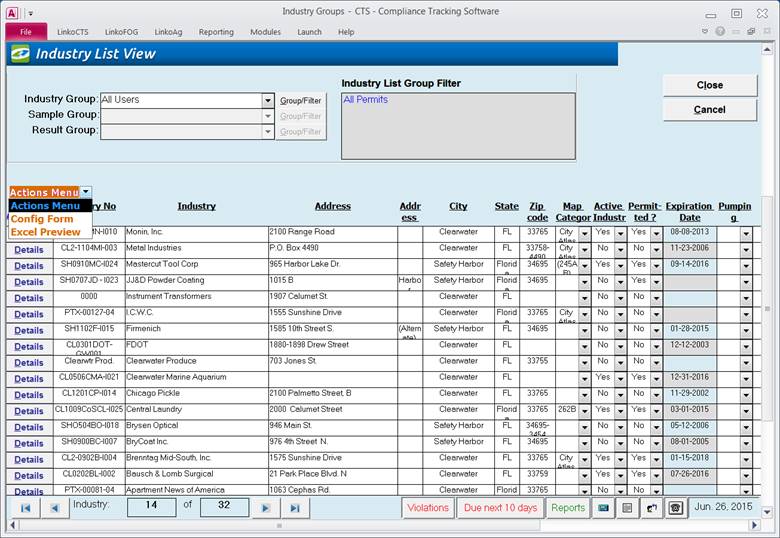
On the List screens, if the word Yes appears next to the magnifying glass, then at least one file is attached. Clicking the magnifying glass will open the Attachment Preview screen. When no value appears next to the magnifying glass, clicking it will open the Select a File to Attach screen.
List view screen example:
A few screens in the software, including the Industry/Facility Details screen and Inspection Details screen will show an attachments tab like below. If files are attached they will be displayed in the list.
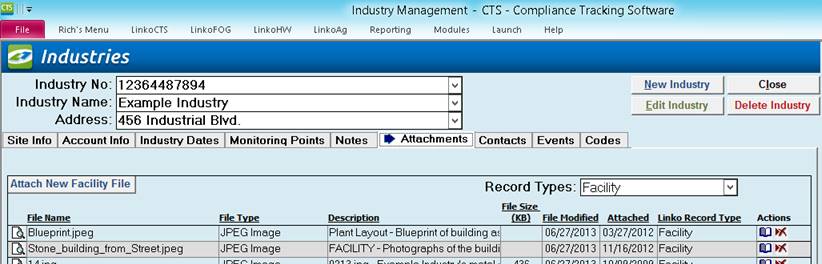
1.
Attach New (Facility) File allows
you to attach a file to this Industry/Facility
2.
![]() - click this button to open the Attachment Preview screen
- click this button to open the Attachment Preview screen
3.
![]() - click this button to open the file so it can be edited
or printed
- click this button to open the file so it can be edited
or printed
4.
![]() - click this button to delete the attached file. It will be permanently deleted
- click this button to delete the attached file. It will be permanently deleted
5. Record Types drop down list allows you to filter the list of attachments to see specific types of attachments. Examples include:
i. Facility – this would be an attachment added under the Attachments Tab above.
ii. Monitoring Points – an attachment that was added to the Monitoring Point via the Monitoring Point and Limits screen.
iii. Permit Events – an attachment added to a Permit Event.
iv. Inspections – an attachment added to an Inspection Event
1. When on the Attachments tab, click on Attach New (Facility) File
2. When on the Details screens, click the Browse… button
3.
When on the List View screens, click the![]() .
.
4. If a file has not yet been attached to that record, the “Select a File to Attach” window will open
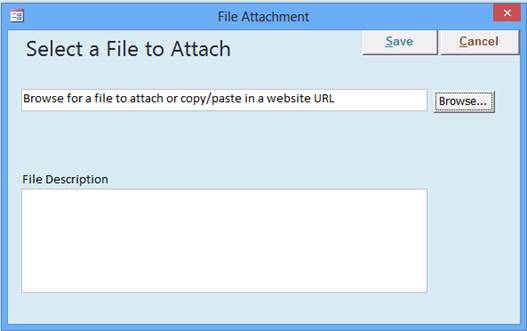
- Click on “Browse” to open a Windows Explorer window and find the
file you want to attach.
i. (Alternately, copy and paste in a website URL, like www.linkoweb.com.)
- Select the file and click on Open.
- The line next to the “Browse” will now show the full location of the file you just selected. NOTE: This is NOT THE FINAL LOCATION OF THE FILE. You should make note of this location as THIS IS THE LOCATION OF THE ORIGINAL FILE.
- Enter a relevant description of the File in the “File Description” box.
- Then Click on SAVE.
i. You could also click on CANCEL to escape the process.
- What happens when you click on SAVE:
i. Linko takes a copy of the original file and places that file in its attachment repository. Users can view and edit that file at any time provided that they have the proper Linko permissions.
ii. THIS IS NOT THE ORIGINAL FILE. IT IS A COPY.
- Attachment Best Practices:
i. Do not attach files that non-Linko users must have access
to.
ii. After attaching a file to Linko, go to the original file and archive
it so it cannot be found and edited accidentally.
iii. Reduce the size of files, in particular image files. Large files take longer to preview and
attach. Image file sizes can typically
be controlled from the settings menu in your camera, smart phone or
tablet. Linko recommends minimizing
files sizes to 1.5 megabytes (MB)
iv. Use the Attachment
Size Configurations to gain more control over what users are
attaching.
- After attaching the file you will be taken to the Attachment
Preview screen.
A preview of the file is
displayed if a ‘preview’ is supported.
Image files and html files as well as website URLs can be previewed inside
the Attachment Preview screen. Other
file types such as Word, Excel and PDF documents can not be previewed.
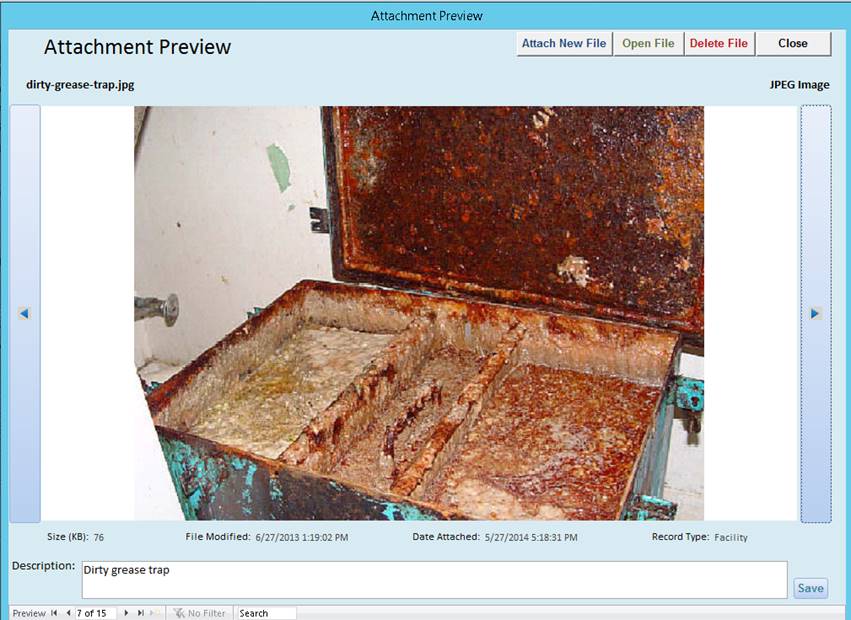
- Functions
available at the Preview screen.
i. Attach New File – opens the Select a File to Attach screen
ii. Delete File – permanently deletes the file. It cannot be recovered.
iii. Open File - will open the file using the default application assigned to that file type by the Windows Operating system. You will be able to view and edit the file. Save the file and the changes are immediately saved to the Linko attachments repository.
1. Caution: Doing a Save As… within the application used to open the file and saving the document in a location outside of the Linko Attachments repository will cause the changes to be lost!
iv. Size (KB) – The size of the file in Kilobytes
v. File Modified – The date the physical file was last modified
vi. Date Attached – The date the file was attached into Linko Attachments repository
vii. Record Type –Identifies the type of Linko record the file was attached to
viii. Description – free form comments you enter about the file
ix. Save – Saves any comments typed into the Description
Users must have Can Edit rights in Linko Security Administration to edit an attached file. If they don’t, a temporary copy of the file is made and the user can view that copy.
Config Link, Linko Configure Screen, and Prompt for Defaults
If you are unable to access the video below, click here instead to launch it in your browser: Config Link
|
|
|
Most list view screens have a small orange Action Menu which contains the Config Link hyperlink that opens the “Configure Screen” for that list view screen. The Configure Screen gives you several options depending on the screen you are configuring. You can:
- Change the width of the fields being displayed
- Check whether or not a field should be visible on the screen
- Change the font size of the field
- Change how the text is aligned (center, left, or right) within the field
- Indicate whether the field requires data be entered into it (not available on all screens)
- Change the order in which fields are displayed on the screen using the “Move columns position on screen” arrows
- Indicate whether you should be Prompted for Defaults (see below)
The “Prompt for Defaults” configuration applies specifically
to the Results Management List View
screen. This column allows the user to
select which fields will have a standard selection for each Parameter Result in
a sample. For example, if you checked
“Collect Method” and “Conc Units” for Prompt for Defaults, when you enter
concentration results for a sample, you will be prompted to enter the “Collect
Method” and “Conc Units” applying to every
parameter being sampled. The value
you enter will be applied to each parameter with a concentration result of ‘NA’
(i.e. you haven’t entered a Result yet).
The purpose of this feature is to limit the amount of data entry
required. Each user must elect to be
presented with the Enter Default Results screen by checking
the “Prompt for ‘NA’ Result Defaults on
New Samples?” box in the Sample and
Results Admin section.
The Publish for All Users button on the Configure Screen can be used to override other users’ configurations. This is useful for displaying the same fields on all users’ screens, and ensuring data entry in key fields. If a screen configuration is “Published,” then each time a user opens Linko, that form configuration is pulled onto that user’s system. Any changes that the user may have made in their last session (on that screen configuration) will be over-written. You can control this functionality in System Administration.
Quickly find, sort and group the information you want on the following screens: Industry List View, Event Management List View, Industry Groups, Sample Groups, Result Groups and the Chain of Custody List View.
A right-click on a displayed field opens the Quick Filter menu. Quick Filter searches for items that match the item in the selected field, and displays all matches found in the list view.
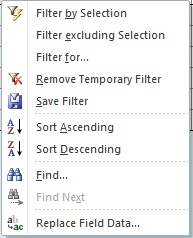
6.
Filter by
Selection returns all records equal to the value of the field you selected with a right-click.
Filtering by a blank “Date Completed” field returns all incomplete records.
7. Filter excluding Selection returns
all records that do not have the value of the field you selected. Find all the
records that have been completed by using this selection on a Blank
“Date Completed” field
8. Filter For … opens the Quick Filter screen
seen below. To find all the records for an Industry, select “Industry Name” from
the main drop menu, then “DO,” “Equals,” and the industry’s name below.
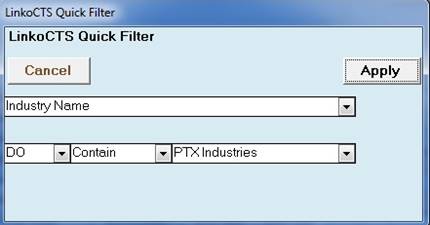
a.
Cancel exits the
Filter window without applying the filter.
b. Apply exits the Filter window and applies the
filter.
9.
Use Remove
temporary filter to return
the List View back to the original sort order. Remove the temporary filter
before you begin another.
10.
Save Filter adds the
filter to the Groups selector.
11.
Sort Ascending and Sort Descending provide the same functionality
as clicking on an underlined column header.
On List View
screens, clicking on any column header that is underlined will instantly
sort the data on the screen either ascending or descending by that particular
field.
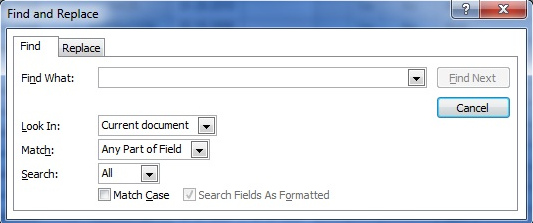
12. Find and Find
Next provide a text search function.
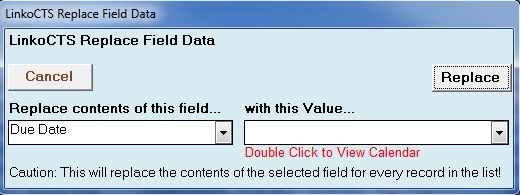
13.
Replace Field
Data opens a popup
form that has one dropdown list of the visible/editable fields on the form, and
another dropdown that has a list of values (if the field selected is a
dropdown), text-entry, or a double-click calendar (if date field). When the user clicks Replace, a message box opens, reminding
the user that all records displayed will be replaced
upon acceptance.
***Note: using the Replace
Field to enter Completed Date will simply do a replace and no other actions. If
a user wants to be prompted to do a follow-up event, they will need to use the
Complete All feature.
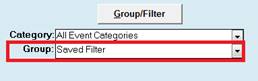
When you apply a Temporary Filter with the Quick Filter, Linko will show the Filter results, and a small control button will appear next to the “Group Filter” button.
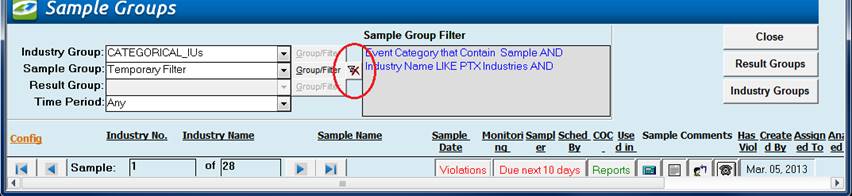
When clicked, this “Remove Temporary Filter” button allows the user to return to the previous non-filtered list view.
Record Selectors can
be seen on many of the list view screens as well as the details view
screens. The selectors help you to navigate
from one record to the next and also display the total number of records.
Simply click on any of the arrows to switch from record to record.
![]()
|
Item |
Description |
|
|< |
Move to the first Item
in collection of Items. |
|
< |
Move to the previous
Item in collection of Items. |
|
(Item number) |
Number of this Item
among all Items. |
|
(Total # of Items) |
Total count of all
Items. |
|
> |
Move to the next Item in
collection of Items. |
|
>| |
Move to the last Item in
collection of Items. |
The items available within the Status Bar change depending on which screen you are on and what features are available.
![]()
All reporting except compliance reports is accessed via the Reports button.
1. The Violations button only displays when there are Violations without Enforcements; it opens Violation List View to see the listing.
2.
Due next # days opens Event List View and sets the
Group to ‘Events Due and Not Complete,’ displaying Events past due or to be
completed in the number of days showing.
The # of days can be configured in Event Admin
à Configurations à Local Configurations à All Events à “Number of Days’ Notice for Due Events”. The button
only displays when there are Events due or past due.
3.
Reports opens a Reports window,
displaying the reports available for the data selected in the List View. For example, clicking this button while
displaying a Violation will open a Reports window offering ‘Violation Summary’,
‘Violations with Related Items’, etc. reports. While displaying a Sample, the
Reports window would open offering the report ‘Samples by Quarter’.
4.
Calculator ![]() opens a calculator.
opens a calculator.
5.
Calendar ![]() opens a window displaying a
calendar. You can also access this
calendar by double clicking on any of date field.
opens a window displaying a
calendar. You can also access this
calendar by double clicking on any of date field.
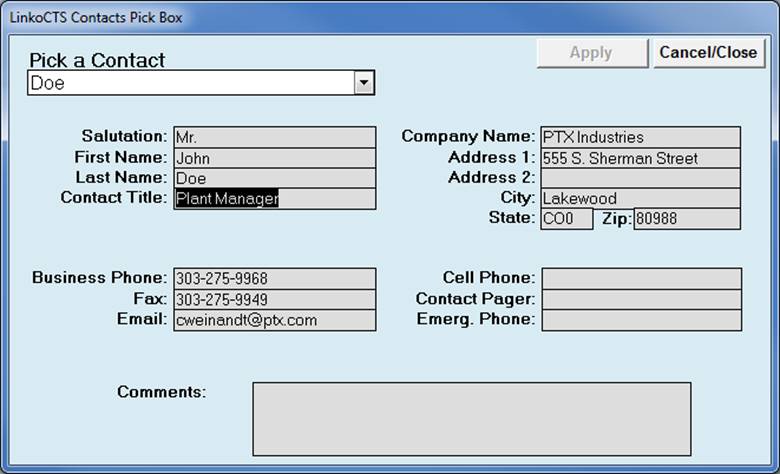
6.
Contacts ![]() opens the Contact Information window containing
all your industry contacts. You can rapidly find a person you need to call.
opens the Contact Information window containing
all your industry contacts. You can rapidly find a person you need to call.
|
Item |
Description |
|
Pick a
Contact |
Combo box allowing user to
select a Contact for display; sorted by last name. |
|
Apply |
Disabled from Status
Bar; will automatically fill in the Contact information on the Contact form
if the user is creating a new contact in Industry Management. |
|
Cancel/Close |
Cancels and closes the
screen without changing the Contact information |
|
Salutation |
Salutation for this
Contact, for example ‘Dr.’ or ‘Mr.’ |
|
First Name |
First Name of this
Contact |
|
Last Name |
Last Name of this
Contact |
|
Contact Title |
Title for this Contact,
for example ‘Director of Operations’ |
|
Company Name |
Name of Contact’s
Company |
|
Address 1 |
First address line for
this Contact |
|
Address 2 |
Second address line for
this Contact |
|
City |
City for this Contact |
|
State |
State for this Contact |
|
Zip Code |
Zip Code for this
Contact |
|
Business Phone |
Business phone number
for this Contact |
|
Fax |
Fax phone number for
this Contact |
|
Email |
Email address for this
Contact |
|
Cell Phone |
Cell phone number for
this Contact |
|
Contact Pager |
Pager number for this
Contact |
|
Emergency Phone |
Emergency phone number
for this Contact |
|
Comments |
Comments about this
Contact |
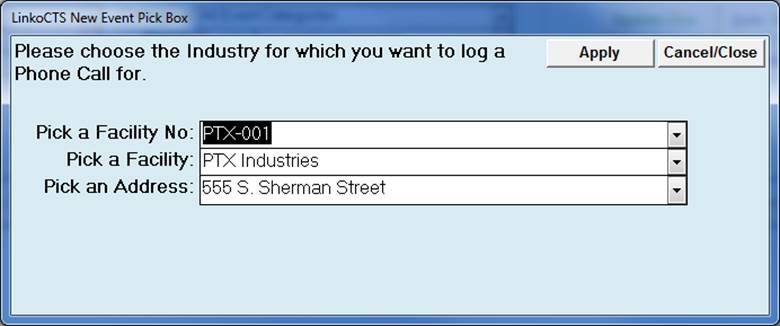
7.
Phone Log ![]() allows you to place an event in
your Phone Log. Opens Choose an Industry window, and then opens a General
Event Details
window for the selected industry, setting the
default event type to ‘PHONE’. You can track your Phone Calls as Events in Event Management.
allows you to place an event in
your Phone Log. Opens Choose an Industry window, and then opens a General
Event Details
window for the selected industry, setting the
default event type to ‘PHONE’. You can track your Phone Calls as Events in Event Management.
|
Item |
Description |
|
Apply |
Select from Industries. |
|
Cancel/Close |
Cancels your choice,
closes window without opening an Event Details or Phone call screen. |
|
Pick an Industry No |
Combo box offering a
list of Industries by Industry #. |
|
Pick an Industry |
Combo
box offering a list of Industries by Name. |
|
Pick and Address |
Combo
box offering a list of Industries by their street address. |
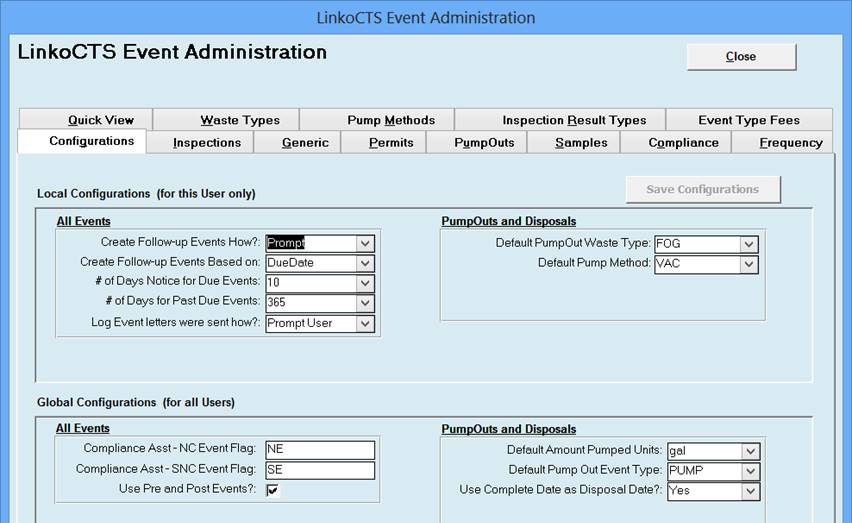
Customize how the software works by setting your configurations. Local Settings affect only a single user, while Global settings affect all users. These configuration settings appear throughout the System Administration screens and affect different parts of the software. Below is an example of configurations related to Event Administration.
Configurations Tabs are available for System Admin, Industry Admin, Samples and Results Admin, and Violations and Enforcements Admin.