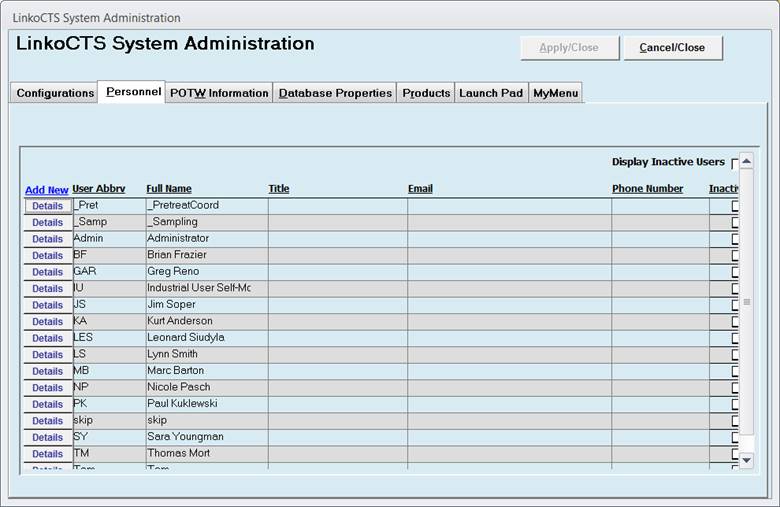
Use the System Administration Sections of our software to modify the "Utility Tables" that contain
lists of Parameters, Units, Personnel, Enforcement Actions, Event types, and
other pick box lists. We ship LinkoCTS
with our standard list of items, but you can add, modify or delete these entries
to match your program's vocabulary and needs.
Note that if you have been using LinkoCTS for a while, you cannot delete
items from these tables if they have already been used.
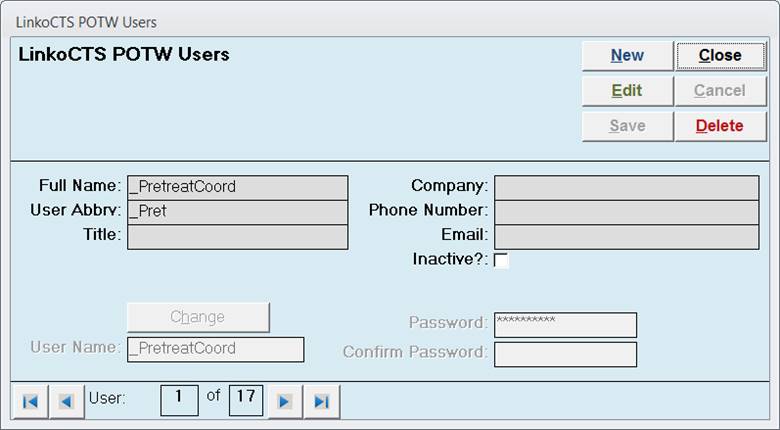
Set up your POTW personnel with their contact information and Linko Login information if Security is enabled.
|
Buttons |
Action performed |
|
Apply / Close |
Not applicable to this
screen. |
|
Cancel / Close |
Closes form without saving
any changes. |
|
Add New |
Allows users to add new
POTW personnel |
|
Details |
Allow users to view and
modify POTW personnel |
|
Item |
Description |
|
User Abbreviation |
Main indicator of who
performed or is scheduled to perform a task.
This abbreviation is displayed on reports and screens. With this in mind chose your abbreviations
carefully. |
|
Full Name |
Full Name of POTW personnel |
|
Title |
Title can be added via the
Personnel section and a mail merge field is available so that the Title can
be used in Mail Merge letters. |
|
Email |
Email can be added via the
Personnel section and a mail merge field is available so that the email
address can be used in Mail Merge letters. |
|
Company |
This is generally the POTW;
however, if you have consultants that you track, you can identify what
company he/she works for. |
|
Phone Number |
Contact number for that
POTW person. This information can be
added to many reports and letters. |
|
Inactive |
Personnel can be
inactivated by editing the details of the individual. Inactive personnel will no longer be a
selectable option in drop down menus.
The personnel will remain assigned to any event previously assigned. |
Enter the POTW address, NPDES# and other
information.

|
Buttons |
Action performed |
|
Apply / Close |
Closes
form and saves any changes. |
|
Cancel / Close |
Closes
form without saving any changes. |
|
Item |
Description |
|
POTW Name |
The
name of Your Authority that will appear on the header of most reports. |
|
Street |
The
Authority street address. |
|
City |
The
Authority city. This city will be the
default city when adding Industries and contacts. |
|
State |
The
Authority state. |
|
Zip |
The
Authority Zip Code. |
|
Country |
The Authority Country. |
|
Signer |
The
name of the Authority person whose name will appear on letters. |
|
NPDES Number |
Enter
the POTW’s NPDES permit number. |
|
Phone |
The
phone number of the facility signer. |
|
Fax |
Fax
Number |
|
Web |
Web
site address for POTW. |
|
Email |
Enter
the email address for the POTW or the signer of the POTW. |

|
Buttons |
Action performed |
|
Apply / Close |
Not
available on this screen. |
|
Cancel / Close |
Closes
form without saving any changes. |
|
Item |
Description |
|
Location
of CTS_PGMS |
This identifies where the Client side of the Linko software resides. |
|
Root
Location of Shared Files |
Linko has a folder called Server that includes templates for Reports and documents, and provides storage for Permit Letters, Docs, and Images. |
|
Review
and Fix Broken Links |
This will open a Broken Links utility screen where users can view and correct missing linked files that were attached in version 13.3 or earlier. |
|
Location
of Database files |
Shows the name of the Server where the SQL database resides and the file path to the SQL database on the SQL server. |
|
Show
Server / DB selection form? |
This check box controls the behavior of your login. When it is checked the window that asks for what server and instance name will appear before you reach the Username and Password window. |
|
Users
Currently attached: |
This is not currently implemented but is intended for administrative functions to monitor how many users are attached and then be able to remove if there is a need for maintenance. |
|
Database
Sizes / Max Database Sizes / Growth Rates |
Like most of these settings this information is mainly directed to the time that you may need tech support. A quick check here allows the easy determination of the SQL server database size, how much room it has been allocated. |
|
Location
of Linko Sync Manager: |
Indicates the location where the Linko Sync Manager software is installed. This software brokers the synchronization of data between your Linko Software database and the Remote Inspector website used by inspectors in the field. |
|
Enter Linko Back Door |
Allows the user to enter a password to gain access to the tables, forms, queries, code of the application. Contact Linko for more details about this. |
|
Generate TSA |
This utility surveys the Linko configuration and checks the MS Office installation. It creates a file with details useful to Linko technical support. You will be prompted to email the file to Linko. |
|
Version Information |
Provides a summary of the LinkoCTS Version, updates, and server and workstation information. See Versioning information. |
|
Buttons |
Action performed |
|
Apply / Close |
Not
available on this screen. |
|
Cancel / Close |
Closes
form without saving any changes. |
|
Item |
Description |
|
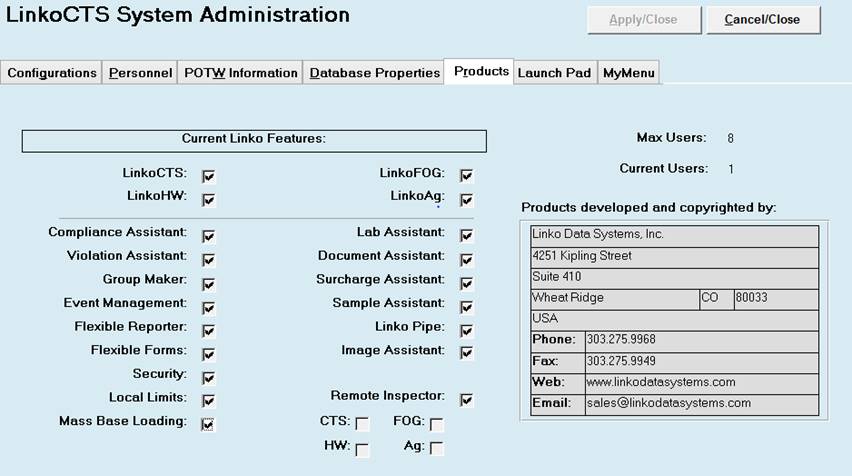
Current Linko CTS Features |
Displays each of the Options Installed in your software. A Check mark means that it is currently installed and active |
|
(Add On Modules) |
Displays each of the Modules Installed in your software. A Check mark means that it is currently installed and active |
|
Max Users |
Number of users that can use the software at the same time. |
|
Current Users |
Number of users currently logged into the software. |
|
Buttons |
Action performed |
|
Apply
/ Close |
Closes form and saves any changes. |
|
Cancel
/ Close |
Closes form without saving any changes. |
|
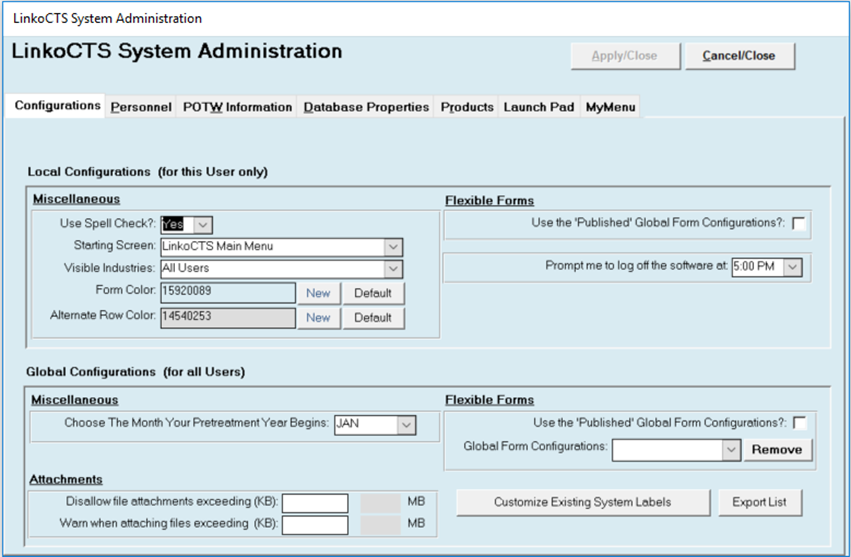
Local
Configurations |
For This User
Only |
|
Miscellaneous |
|
|
Use Spell Check |
When YES, a Spell Check will be performed on most data entry fields - fields where large amounts of text can be entered (memos). |
|
Starting Screen |
What screen should open when the user starts Linko? Selection will depend on what modules and features you have installed. When you open LinkoCTS, it will automatically display this screen. |
|
Visible
Industries |
Use Groups and Queries to create a group of
Active Industries, or a group of Industries assigned to a certain POTW
personnel. Then choose that Group from this field’s listing, and only those
Industries in that group, will appear in a Select By: Industry selection
list. This permits the
user to set what list of Industries will show in the drop down lists.
Previously, if you retired an Industry or it closed, it was still in your
lists. Now you can use this field to set what Group you have defined as the
one you want the drop down listings to use. The Groups and Queries listing will continue to
show all the Industries in the database. |
|
Form Color |
Use the color picker to change the form color to whatever color you would like. You can always use the default color button to reset the color. |
|
New (Form Color) |
Choose a New form color from the Color Pick screen. |
|
Default (Form Color) |
Return your forms to the default color. |
|
Flexible Forms |
|
|
Use the Published
Global Forms Configuration |
Checking this selection box forces this user of LinkoCTS to use the globally published list view forms and their configurations... |
|
Global
Configurations |
For All
Users |
|
Miscellaneous |
|
|
Choose the Month
Your Fiscal Year Begins |
Enter the month that the fiscal year begins at your POTW. This date will customize the quarters that you see within our system. With this field filled in, the 1st Quarter that you see in our system will be the first quarter that your POTW uses. This will be consistent for all of the Quarters. This is a Global setting for all users, and is not affected by the Global / Local Configurations for Flexible Forms. |
|
Flexible Forms |
|
|
Use the Published
Global Forms Configurations |
Checking this selection box over-rides any Local Configurations, and forces all users to use the globally published forms and their configuration in List Views. All users are forced to get the screen configurations regardless of the Local Configuration value. |
|
|
|
|
Disallow file
attachments exceeding (KB): |
Allows you to prevent users from attaching large files. Large files can be slow to preview or open over a network. This is especially true of images. |
|
Warn when attaching
files exceeding (KB): |
When a use attaches a file exceeding this size, they will first be warned. This allows you to notify the user that the file can be attached but it may be so large that previewing it or opening it later may cause slowness in the software. |
|
Dynamic System
Labels |
|
|
Customize Existing
System Labels |
Opens the Dynamic System
Labels Edit window. |
|
Export List |
Exports a list of system fields with their original and dynamic
labels to Excel. |
Local Configurations apply to whoever uses that computer, if Linko does not have Security. If you use Linko Security, you have to login as an individual user to access Linko, and then the configuration changes you make are applied individually to that logged-in user. This means a user can go to a different computer and get their personal configurations. Global Configurations are applied to all users.
The use of Local Configurations and Global Configurations allows your POTW to create standardized screen setups for all users or allow individual setups. One possible scenario would be the Linko System Administrator using the Global Setting to force everyone on LinkoCTS to have a standard setup. Then later, the Admin could turn off the Global Settings and allow certain users to configure their own screens.
If the Linko Security feature is installed, access to change the Local Configuration fields in System Administration can be disabled.
|
Local Configurations, Use the ‘Published’ Global Forms Configurations |
Global Configurations, Use the ‘Published’ Global Forms Configurations |
User gets: |
|
Selected |
Unselected |
The Screens that are published for all users. |
|
Unselected / Selected |
Selected |
The Screen configurations that have been Published to all Users: The Global Settings over-ride the local. |
|
Unselected |
Unselected |
None of the Published settings. |
Customize the Linko software to create a menu that will launch other applications and documents, including all of the Microsoft Office Tools, pdf readers, or Internet Explorer to open a web site.
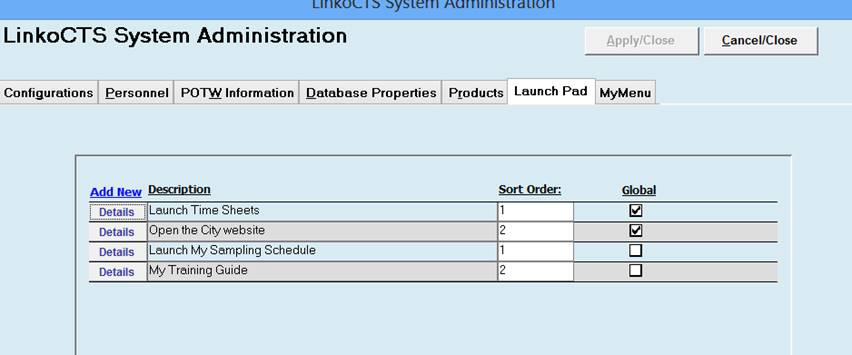
Add new – Clicking here opens the Launch Item Details screen where you create your new Launch Item.
Description – Displays the information you entered as the description for your Launch Item.
Sort Order – Use this field to choose the order in which Launch Items are displayed.
Global – This is a display field on this screen that shows whether the Launch Item will appear on just the current user’s Menu or on all users’ Menus.
The above configuration creates a Launch Menu that looks like this:

The CONFIGURE selection takes you to this System Administration – Launch Pad section of the Linko Software.
The Launch Item Details screen is where you create your custom Launch Items:
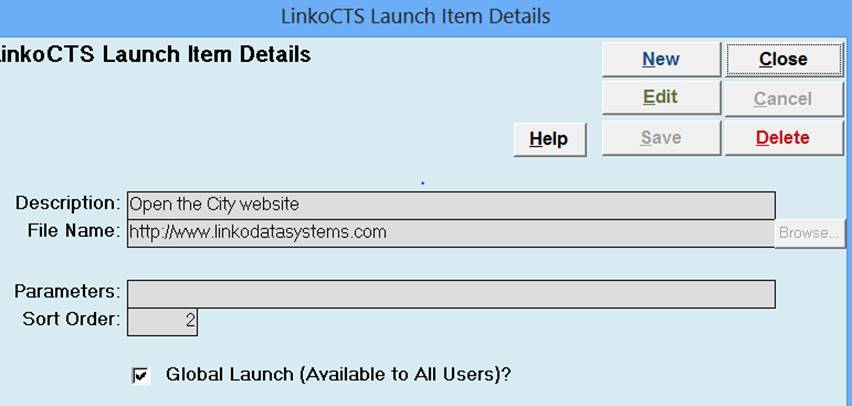
Browse – Opens a Windows Explorer box so you can find a
specific file to open.
File Name – You can use Browse or just type in the location of
the file or a Website address.
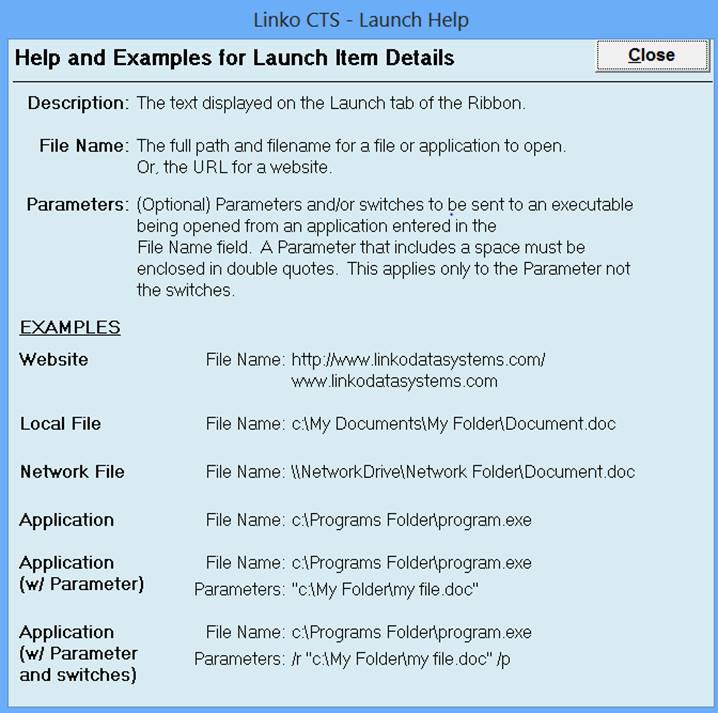
Help – opens the following Help Details screen that
provides additional assistance in using the Launch Items.
See the following screen:
The Ribbon Toolbar can be customized for the individual user. Create your own selection of the places in the Linko software you use the most.

EditMyMenu – Click here to create a menu or edit the existing one. This opens the
Ribbon Tab Details screen.
Ribbon Tabs Visible – If you have LinkoFOG and LinkoCTS but you only work
in the CTS side of the software, you can remove the LinkoFOG from the menu by
unchecking its selector.
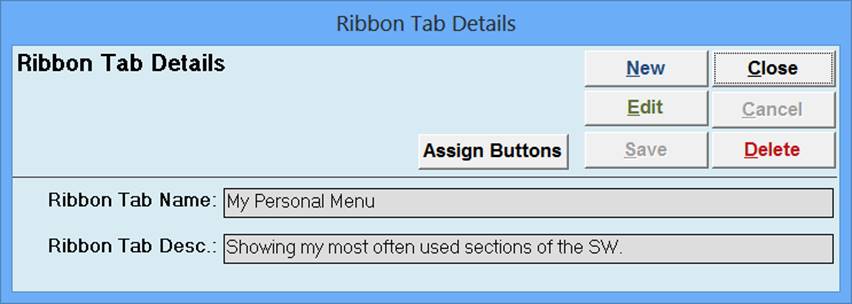
Click on New or Edit to create or modify your Ribbon Tab
Ribbon Tab Name and Desc - This information shows up in the Ribbon to point out
what the menu is.

Assign Buttons – Opens the windows where you actually choose and assign the parts of the
Linko Software that you want to show up in your Personal Menu.
Ribbon Tabs and Buttons – Allows you to select different menu sections of the software,
add a couple of sections to your personal tab by clicking on “ADD>>” and
then choose another section of the software.
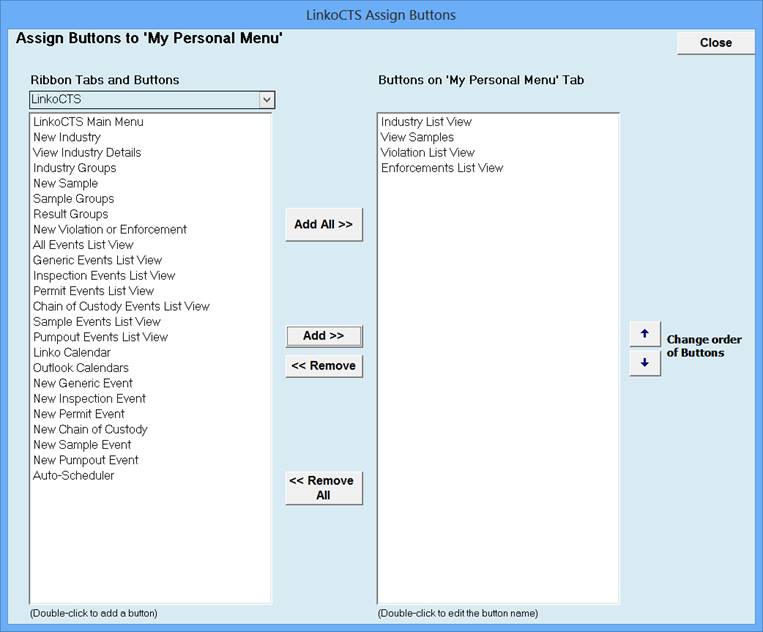
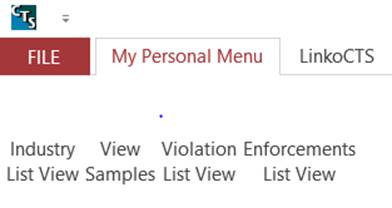
Your Personal Selections show up when you click on the customized Tab.
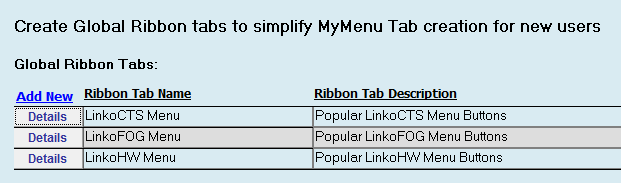
Your Linko Administrator can create a specific menu that you can use to start with to help get started with the MyMenu setup using the Global Ribbon Tabs.
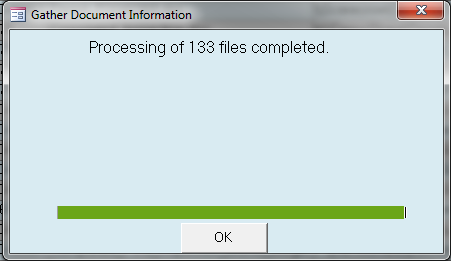
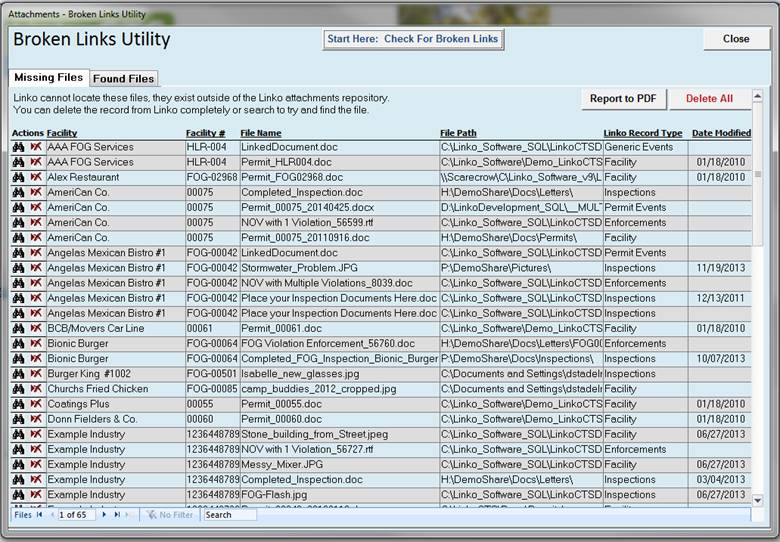
This utility is for Linko software users upgrading from version 13.3 or earlier. It will allow you to see a list of all the files that were attached or linked in earlier versions of the software. It will then inventory those files, identifying which still exist at the location they were linked and which are missing.
Click Start Here: Check For Broken Links and Linko will get a list of all files attached in version 13.3 or earlier and determine if they exist. The screen below will be displayed.
After completion you can toggle betwee Missing Files
and Found Files
Missing Files – Files that Linko can’t find. The
path to the file is not valid or the file has been moved or deleted. Follow the on screen instructions to either
delete or try to find the file.
Use Report to PDF to
generate a report that includes more details about the Linko record the file
was attached to. This allows you to go
to that area of the software to further investigate the file.
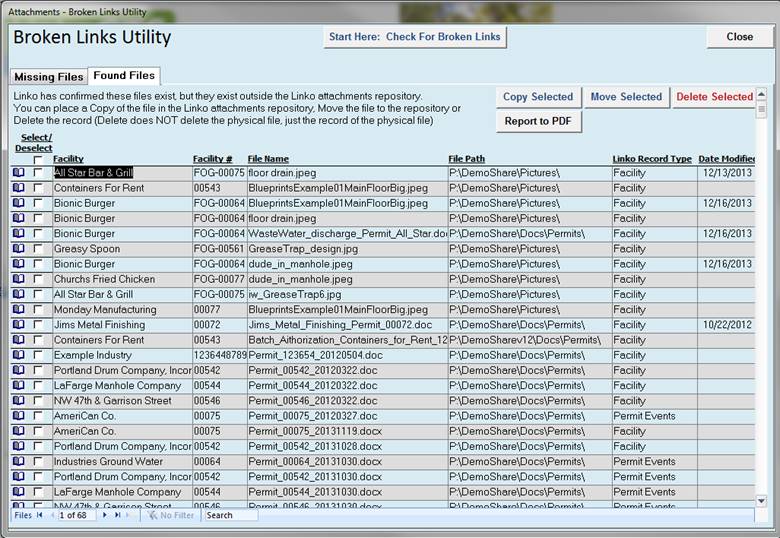
Found Files – These files exist, but they are not within the Linko Attachments
repository. We recommend you Move these files to the Linko
Repository so there is no chance of them going missing again in the future
Use Report to PDF to
generate a report that includes more details about the Linko record the file
was attached to. This allows you to go
to that area of the software to further investigate the file.
Use Move Selected to actually move the file from
it’s current location and place it into the Linko Attachments Respository. The file will no longer exist at is original
location.
Use Copy Selected to place a copy of the file into
the Linko Attachments Respository. The
original file stays as is. If you select
this option, you should then archive the original, place it where it can not be
accidentally edited or mistaken as the File of Record.
Use Delete Selected to remove the attachment record
from the software altogether. This DOES
NOT delete the file, just the reference to it in the Linko software.
|
Buttons |
Action performed |
|
Close |
Closes form without saving any changes. |
|
Save
Configurations |
Applies the changes that were made and gives a message
about when the changes will be applied. |
|
Add New |
Under the Tab for each Event Type, you create a new Event of that type with Add New. See the Admin Add / Edit Details for Events. |
|
Details |
Under the Tab for each Event Type, you edit / modify an Event of that type with Details. See the Admin Add / Edit Details for Events. |
|
Tabs |
Description |
|
Inspections |
Create Event types for Inspections. |
|
Generic |
Create Generic Event types. This is a catchall event type. Use it for Phone Calls, General Reminders
or tracking a due Report from the Industry. |
|
Permits |
Create Permit related event types. For example, you can use Renewal, Expirations, or Invoice events to track the Permit status. |
|
PumpOuts |
Linko added new Event types for PumpOuts in CTS Version 9 to give the POTW the option of recording PumpOut and Disposal Events for Industries. |
|
Samples |
Create Sample types for sampling events. |
|
Compliance |
The Compliance Events tab is a collection of all of the
Compliance Events created in each of the other tabs. Once the Compliance Event is checked on the
Details Screen, it will be displayed in the Compliance Event tab. |
|
Frequency |
Add, Modify and View Frequencies
within this tab. These frequencies are
used throughout the program and specifically in the Auto
Scheduler. |
|
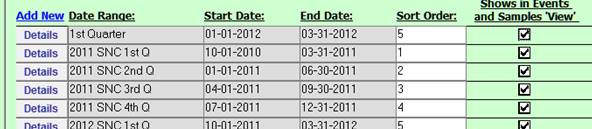
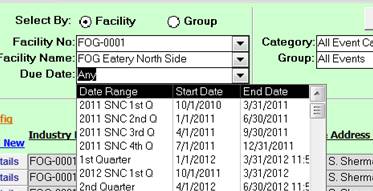
Quick View |
The Quick View Tab lets the user customize the date options available throughout the program in the Quick View Combo Box. Go to Sample Management, Event Management, or Violations to view an example of the Quick View combo box. It is not always named quick view but it is always in the same location. The Quick View Tab allows the user to assign SORT ORDER values that change the order of the displayed Date Ranges: This sort order:
Produces this
|
|
Shows in Events and
Samples View List |
This field under the Quick View Tab allows the user to
select which of the Quick View Date ranges will appear in the Date Listings
in Event Management and Sample Management |
|
Compliance Event |
This field under the Compliance Tab displays for the user
whether or not the type of events will be used in Compliance
calculations. The field is not editable here. To change the value go to
Inspections, Generic, Permits, PumpOuts, or Samples Tabs and add ‘Days Late Allowed NC’ or ‘SNC’. |
|
Waste Types |
Create different
types of wastes that you can assign to PumpOut and Disposal Events. Values
from the Waste Types Tab are used in the Configurations Tab when choosing the
Default PumpOut Waste Type and in the PumpOut Event Details screen
Waste Type drop down listing. |
|
Pump Methods |
Create different types of pumping methods that you can assign PumpOut and Disposal Events. Values from the Pump Methods Tab are used in the Configurations Tab when choosing the Default Pump Method and in the PumpOut Event Details screen Pump Method drop down listing. |
|
Inspection Result Types |
Create different types of Inspection results that you can assign to Inspection events. Values from the Inspection Results Types Tab are used in the Inspection Details screen. |
|
Configuration |
The Configurations tab is listed below. |
|
Event Type Fees |
This feature allows the user to configure a Fee structure
for events.
|
|
Local
Configurations |
For This User
Only |
|
All Events |
|
|
Create Follow-up
Events How? |
LinkoCTS will automatically create another event for you
when you complete an event with a frequency.
How should follow-up events be handled? Choices are: Prompt, Automatically, or Never. |
|
Create Follow-up
Events Based on: |
When completing an event with a frequency, what date
should the Follow-up Event be calculated from? Choices are: Due Date or Complete Date. |
|
# of Days’ Notice
for Due Events |
This changes the number of days that are used in the “DUE
NEXT xx DAYS” button in the STATUS BAR at the bottom of List View Screens |
|
# of Days for Past
Due Events |
This limits the number of days that Linko will go back in
time to display Past Due Events. 365 days will limit the Past Due Events to
the last 12 months. |
|
Log Event Letters
were sent how? |
When printing an event letter, LinkoCTS can automatically
log the fact that a letter was sent on the original event. How should that
letter be logged? Choices are:
Automatically, Prompt User, Never. |
|
PumpOuts
and Disposals |
|
|
This selection chooses the Default Waste Type used for the event type: PumpOut and Disposal. A user-defined list of waste types can be selected from the Waste Types Tab in Event Administration The value typically will
be FOG but other settings may be used. When you create a new PumpOut and Disposal Event, the Waste Type field automatically fills in with the value you choose here. |
|
|
This selection chooses the Default PumpOut Pump Method used for the PumpOut and Disposal Type of event. A user-defined list of Pump Methods can be selected from the Pump Methods Tab in Event Administration. The actual type of pump method will depend on the vehicles used by the Waste Haulers. The value typically will
be VAC but other settings may be used. When you create a new PumpOut and Disposal Event, the Pump Method field automatically fills in with the value you choose here. |
|
|
Global
Configurations |
For All
Users |
|
All Events |
|
|
Compliance Asst – NC
Event Flag |
The symbol (or flag) that appears when an event is
completed past the Non Compliance Date.
The default flag is NE. To
use a different daily flag, type a new one. This flag shows on the Event
Compliance reports in Compliance Assistant à
Event Compliance tab. |
|
Compliance Asst –
SNC Event Flag |
The symbol (or flag) that appears when an event is
completed past the Significant Non Compliance Date. The default flag is SE. To use a different daily flag, type a new
one. This flag shows on the Event Compliance reports in Compliance
Assistant à Event Compliance tab. |
|
This configuration
allows the user to enable or disable the software feature called “Pre and
Post Events.” Due to the relative
complexity of the use of Pre and Post Events, Linko is now shipping with Pre
/ Post Events DISABLED and this is the recommended configuration setting. For past users of
the Linko software who were using Pre / Post Events, no changes will be seen
as backward compatibility is being provided. |
|
|
PumpOuts
and Disposals |
|
|
This selection chooses the Default Units for Amount Waste Disposed of from a PumpOut and Disposal event at an Industry. The units that can be selected come from the Units Tab of Samples and Results Admin. The value typically will
be GAL but other settings may be used. When this setting is
changed in the Hauled Waste Module it also changes it in the FOG Module (if
available), and the reverse. |
|
|
This selection chooses the Default Event Type that will be assigned automatically to a new PumpOut and Disposal Event. Add New Values for this list at the PumpOuts Tab under Event Administration. Then select that new PumpOut type here. When you create a new PumpOut and Disposal Event, the
Event type field in the PumpOut and
Disposal Event Details will automatically fill in with the value you
choose here. |
|
|
Linko maintains the Disposal Date and PumpOut Complete date as the same date for a PumpOut and Disposal event when set to YES. |
|
|
|
|
|
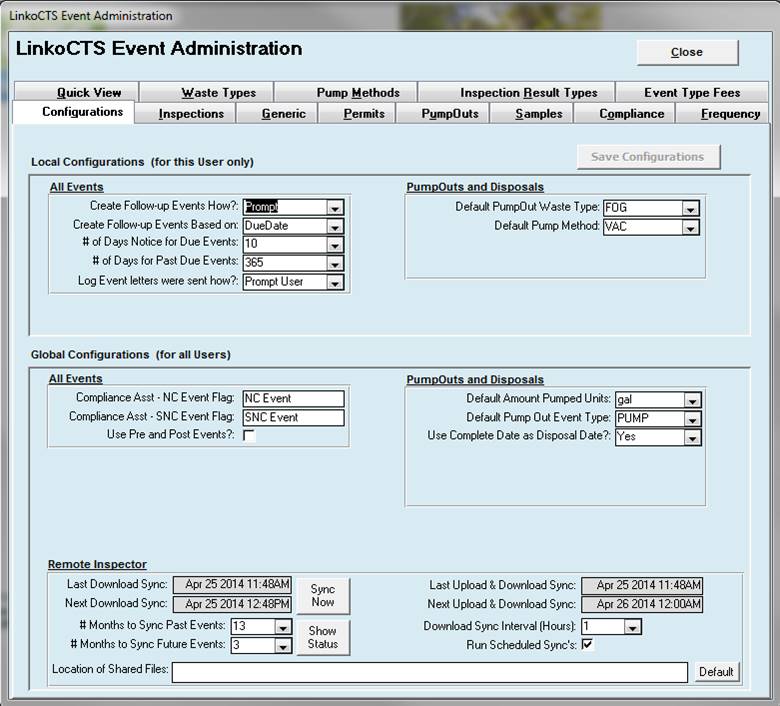
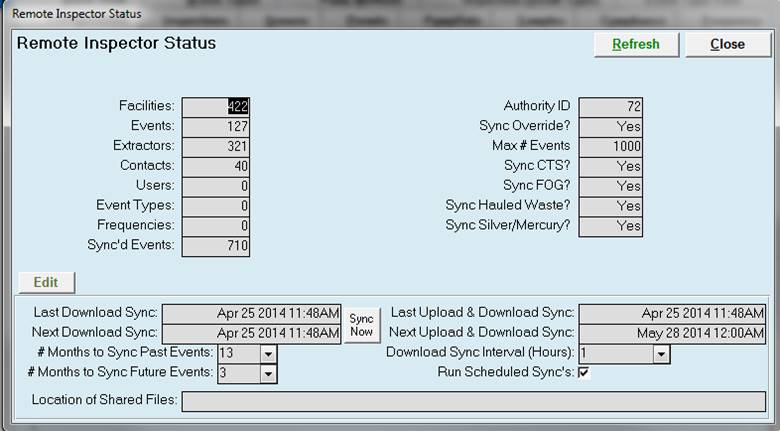
Last Download Sync |
The last time data
entered by inspectors in the field was updated in the Linko software |
|
Next Download Sync |
The next time that
sync will occur again |
|
# Months to Sync
Past Events: |
Allows you to limit
what the inspectors see in the field.
For example, do they need to see inspections from just last year or 5
years ago? |
|
# of Months to Sync
Future Events |
How far in the
future should inspectors see scheduled inspections. It’s typically not useful to see
inspections scheduled 5 years in the future. |
|
Last Upload and
Download Sync: |
The last time
changes made in the Linko software were updated in Remote Inspector for the
inspectors in the field to see.
Whenever an upload takes place, a download takes places too. |
|
Next Upload &
Download Sync: |
The next time that
sync is scheduled to take place |
|
Download Sync
Interval (Hours): |
How frequently
would you like the Download Sync to occur |
|
Run scheduled Syncs: |
This allows your
to turn off the sync. It will also
appear off if a sync is currently in process. |
|
Location of Shared
Files: |
This is the
location of the Linko Shared Files where Attachments are stored on your
network. This setting is the same for
all users of Linko. |
|
Default: |
Pressing this will
place the currently logged in users Root Location of Shared Files into the
Location of Shared Files field. This is useful during initial configuration
of Remote Inspector |
|
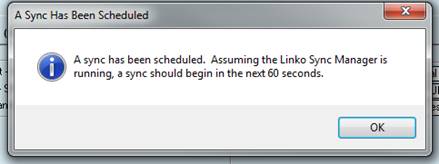
Sync
Now |
Press this button
to force an upload and download sync immediately. This will tell the Linko Sync Manager
software, which is typically installed on another server, to perform a
sync. Assuming the Linko Sync Manager
is running, a sync will start within 60 seconds. Use Sync Status to confirm the sync ran. |
|
Show
Status |
This displays information
about how Remote Inspector is configured.
It is used primarily by Linko Technical Support. Click the Refresh button to update the values on this
screen. After a sync completes, you
will see the Last Upload & Download Sync date and time update so you know
the sync has ran and is done. |
|
|
|

Use the Event Utility tables in Event Administration to add types of events that you want to track, and to configure Days Late Allowed for NC and SNC of events.
|
Item |
Description |
|
New |
Clears values and allows
you to create a new Event. While
editing, the New, Edit, Close, and Record Selector buttons will be disabled. |
|
Edit |
Allows you to edit the
displayed Event. While editing, the
New, Edit, Close, and Record Selector buttons will be disabled. |
|
Save |
Saves the changes made
to the Event. Only enabled while
editing or creating an entry. |
|
Close |
Closes the screen. |
|
Cancel |
Cancels any changes made
to the Event. Only enabled while editing or creating an entry. |
|
Delete |
Deletes the Event. |
|
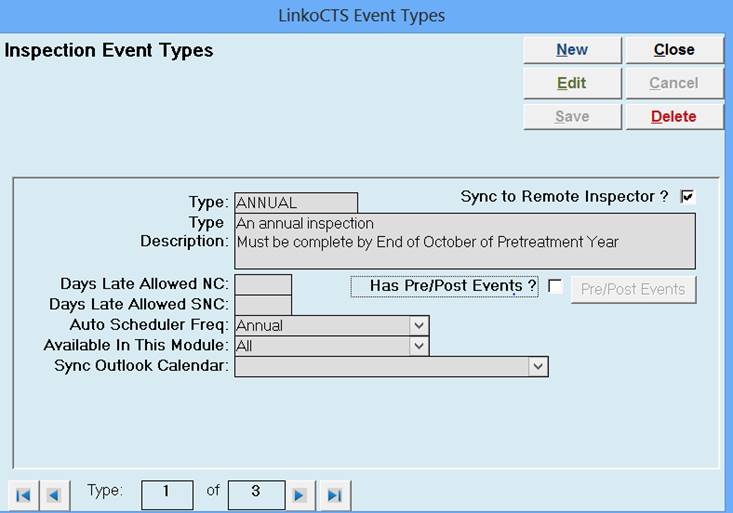
Event Type |
Enter the name of the
event type. |
|
Event Type Descriptions |
Describe the event type |
|
Has Pre and Post Events |
(when used) Pre / Post
Notify Events can be created by clicking on the Pre and Post events button.
Pre and Post Notify will automatically generate events before and after the
original events are due. For example,
users can create a pre-event to notify POTW personnel of an upcoming sample
event. This can be used to prepare the
sample bottles and review the types of samples to take. This is a discontinued
feature provided for backwards compatibility. Please see the Pre / Post Configuration setting. |
|
|
Is this an event you
would like to check for non-compliance?
If so add a number to this field that represents how many days late an
event has to be prior to being considered Out of Compliance. The software will use this number when
calculating event compliance in the Compliance
Assistant. |
|
Days Late Allowed SNC |
Is this an event you
would like to check for SNC compliance?
If so add a number to this field that represents how many days late an
event has to be prior to being considered Significant Out of Compliance. The
software will use this number when calculating event compliance in the Compliance Assistant. |
|
Auto Scheduling Freq |
What is the frequency
you would like to use for this event in the “Auto
Scheduler”? |
|
Available in this Module |
Allows the user to
choose in which Module this event will be available for selection. |
|
Sync Outlook Calendar |
Enter in the Path for
the Linko to Outlook Synchronization tool to use with this event type. |
|
Record Selectors |
Standard Record Selectors allowing you to move between displayed
Event Types for that Category. |
|
Pre/Post Events |
Allows you to create an
event occurring before and after the event you are creating. Useful for creating reminders about an
upcoming event or follow-up on a completed event. |
|
Buttons |
Action performed |
|
Close |
Closes the form without saving changes. |
|
Save Configurations |
Applies the changes that were made. |
|
Add New |
Under the different Tabs, Add New provides you the ability to create a new member of the table. |
|
Details |
Under the different Tabs, you edit / modify a member of the table with Details. |
|
Tabs |
Description |
|
Class Codes |
Add or edit the Industry Classifications being pulled into
the Industry Management Screen. |
|
CAT Codes |
Add or edit the CAT Codes being pulled into the Industry Management Screen. |
|
SIC Codes |
Add or edit the SIC Codes being pulled into the Industry
Management Screen. |
|
NAIC Codes |
Add or edit the NAIC Codes being pulled into the Industry
Management Screen. |
|
Compliance Status |
Add or edit the Compliance Status being applied to the Industry. |
|
Misc. Codes |
Add or edit the MISC
Codes being pulled into the Industry Management Screen. |
|
Contact Types |
Add or edit the Industry Contact Types being pulled into
the Contacts Details Screen. |
|
Permit Note Types |
Add or edit the Industry Note Types being pulled into the
Industry Management Screen. Industry
notes are used to describe all aspects of the industries operation. |
|
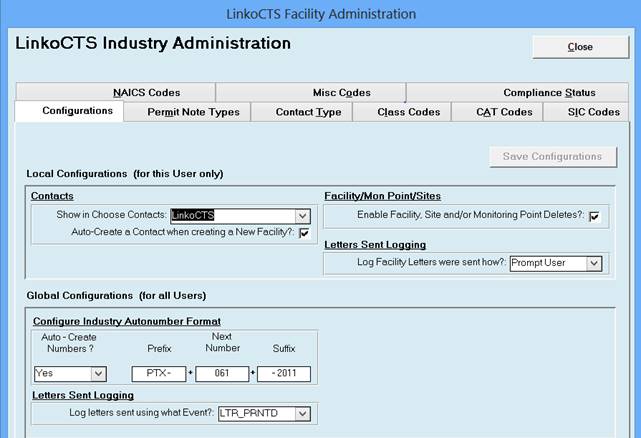
Local
Configurations |
For This User Only |
|
Contacts |
|
|
Show in Choose
Contacts |
When Selecting Contacts from the Choose Contacts screen,
show all the Contacts or just the Contacts from the selected available Linko
Applications? You could choose LinkoCTS here; then just the Contacts from the
IPP tracking side of the software would be available to select. If you also
have LinkoFOG software and select “All” then LinkoFOG contacts would also be
available to choose. |
|
Auto-Create A
Contact when creating a New Industry? |
When you create a new Industry you can select here whether
or not a New Contact will be automatically created. This affects the way your
reports run, and Linko recommends that you always create a Contact for each
Industry. |
|
Facility /
Mon Point / Sites |
|
|
Enable Industry,
Site and / or Monitoring Point Deletes? |
To allow the deletion of Permits/ Facilities / Industries,
Sites, and Monitoring Points, check this box.
When not selected, these may not be deleted. |
|
Letters
Sent Logging |
|
|
Log Industry Letters
were sent how? |
When Mail Merge letters are sent, Linko automatically
creates an event keeping record of that action. Choose to log printing an Industry letter:
Automatically, Prompt User, or Never. |
|
Global
Configurations |
For All
Users |
|
Configure Hauler
AutoNumber Format |
|
|
Auto-Create Numbers? |
When creating a new Industry, should Linko auto-generate a
new Industry / permit number? |
|
Prefix |
Letters to begin the auto-generated Permit number. |
|
Next Number |
Numbers that count sequentially for part of the
Auto-number |
|
Suffix |
Any ending phrase for the permit. Default is a year value. |
|
Letters
Sent Logging |
|
|
Log Letters sent
using what Event? |
When Printing an Industry letter what Generic Event Type should be used to log that action? |

|
Buttons |
Action performed |
|
Close |
Closes the form without saving changes. If changes were
made will warn that they need to be saved. |
|
Save
Configurations |
Applies the changes that were made. These changes will not
apply until the next time you open Linko. |
|
Add New |
Under each Tab in Samples and Results Admin, you add a member to that Table Listing by using Add New. |
|
Details |
Under each Tab in Samples and Results Admin, you edit / modify a member of that Table Listing by using Details. |
|
Tabs |
Description |
|
Parameters |
Add or modify the Parameters that are being reviewed by
your POTW. Modify TRC Value, add valid
Lab Analysis Methods for each parameter, identify proper preservation
methods, Sort Order and others by using the Details button. Note: If a user tries to change the name of a
Parameter, Linko will check and see if that Parameter is in use in Limits,
Results, etc. If the Parameter is in
use, Linko will prompt the user to that affect and ask the user if they want
to continue with changing the parameter’s name. It would be advisable to make a
note of what it discovers. It will then update the name throughout the
software. |
|
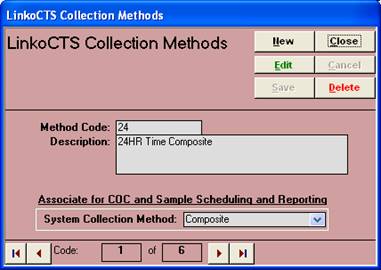
Collection Methods |
Add or modify collection methods being used by your POTW. Update “System Collection Method” for the Collection Methods for use with the Sample Scheduling and Reporting.
See the section on
configuring Sampling Schedules. |
|
Units |
Required units for this parameter. Note: for the software to calculate
compliance, Units have to match between the compliance limit and the result. |
|
Sampling Scheduling Types |
Who is scheduled to take the sample? Most often it is the Industry or Authority. |
|
Laboratories |
A listing of the different labs that might be doing the
testing. Used in the Chain of Custody
add-on module and this tab is only available when the COC / Sampling
Assistant module is enabled. |
|
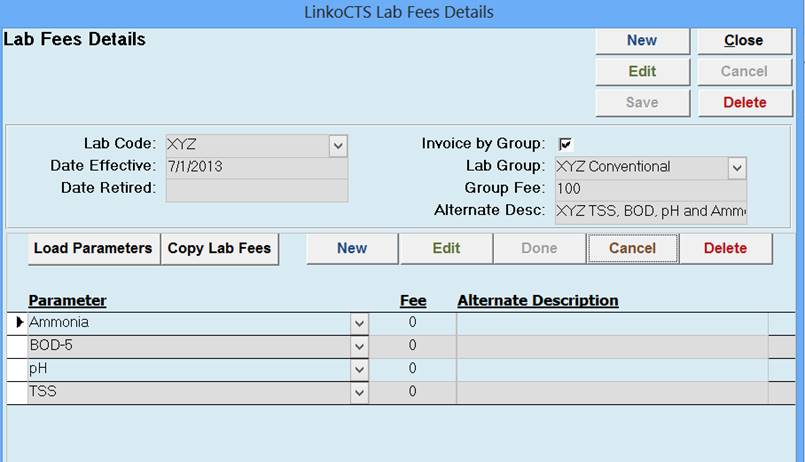
Lab Fees |
Used to configure fee structures for Group sampling or individual parameter sampling. Used in conjunction with the Sampling Assistant Module to make reports that show the costs of the sampling. |
|
Analysis Methods |
A list of approved and standardized methods for laboratory
analysis associated with a parameter. |
|
Configurations |
|
|
Local
Configurations |
For This User
Only |
|
Results |
|
|
Use Fast Result Data
Entry Screen? |
When selected, Parameter Results can be entered directly
in the Results Management List screen
in addition to using the Results Details.
Linko recommends selecting YES. |
|
Warn When Invalid
Analysis Method Chosen? |
When entering an Analysis Method for a Parameter in Results Management, should Linko warn the
user when the method they entered is not listed as a valid Analysis method
for that parameter? |
|
Warn if Daily Result
Exceeds Monthly Limit? |
When entering a Parameter in Results Management, should Linko warn the
user if the concentration result exceeds the Monthly Average Limit? |
|
Prompt for ‘NA’
Result Defaults on New Samples? |
When this configuration is selected, all fields that have the “Prompt for Defaults” column checked in the Results Management Config screen are displayed in the Enter Default Results screen. This screen
appears when entering the Results Management
screen for any new sample. The
user has the ability to enter the information that should be “defaulted” into
each parameter result with a value of “NA”.
The same affect is created by clicking the “Apply Default” button in
the Results Details. |
|
Allow Delete ‘Na’ in
Result Groups |
When using Result Groups in Groups and Queries, the user
can use this configuration to select whether the “Delete Records with NA
Results” control is shown or not. |
|
Auto-Add ‘NA’ to New
Sample Results? |
When in Results Management
screen and starting to add a new sample, do you want a list of the monitoring point parameters to be
automatically displayed? Yes, No and Ask.
Selecting either Yes or Ask will cause the Enter Default Results screen to
be displayed if the “Prompt for ‘NA’ Result Defaults on New Samples?” is
checked. |
|
Create Result Limit
Violations? |
When users enter results that are over the compliance
limit, the software can either automatically create violations or ask the
user if he/she wants to create the violations. Users can select yes or no at that point. |
|
Create Hold Time
Violations? |
When entering results
data manually, and a hold time is exceeded, how do you want Violations
created? Selections are:
Automatically, Prompt User, Never.
Invalid hold times are determined by comparing the Lab Analysis Date to either the End Date Sampled or Start Date Sampled entered on the Result Management screen. (as configured in “Base Hold Time Calculations On” configuration) If the difference in days exceeds the Hold Time
entered for the parameter in the Parameter Table Listing under Samples and Results Administration, then the user
will be prompted based on this setting. |
|
Create Collect
Method Violations? |
When entering results data manually, and an improper Collection Method is entered, how do you want to Violations created? Selections are: Automatically, Prompt User, Never. Improper Collection Methods are determined by comparing
the Collect Method assigned in the Monitoring
Points for each parameter as compared to the Collection Method entered in
the Result Management screen. If the two do not match, then the user will
be prompted based on this setting. |
|
Samples |
|
|
Use Fast Sample Data
Entry Screen? |
When selected, Samples can be entered directly in the Sample Management List screen in
addition to using the Samples Details. Linko recommends setting this to Yes. |
|
Auto-Check ‘COC
Filed’ When Result NA’s Gone? |
“COC filed” has the same significance as saying “All Results Entered.” This setting controls the behavior of the “COC Filed” field on the Sample Management list view. If this is selected to be auto completed, once results are entered on the Results form and no NAs exist as values, Linko will automatically change the “COC filed” field on the Samples Screen to YES. Users will not be able to change the COC filed box on the Samples Screen. Otherwise if the Auto Check COC filed is not checked in
the system administration, uses will be able to check the COC filed box on
the samples screen at their discretion and Linko will not automatically set
it to YES. |
|
Auto-Fill Sample
Name on New Samples? |
On the Sample
Management and the Sample Details
screen, when the user fills in the Sample Date, and Monitoring point, our
system will automatically fill in the sample name. |
|
Show all Samples in
Sample Averages? |
If you set this to Yes, then even if you have already used
a Sample in a Sample Average on the Samples
Management screen, you can use the same sample again in another average. |
|
Use as Sample
Violation Date? |
LinkoFOG can automatically create a violation for
parameter non-compliance. What date
should it use as the Non-Compliance date of the Violation? Choices are the
Sample Date or Today’s Date. |
|
Global
Configurations |
For All
Users |
|
Parameter
Result Compliance |
|
|
Exceeds Daily Limit
Flag |
The symbol (or flag) that appears when a result exceeds
the daily limit. The default flag is D. To use a different daily flag, type a new
one. |
|
Exceeds Local Limit
Flag |
When Local Limits are enabled, this is the symbol (or
flag) that appears when a result exceeds the Daily Local Limit. The default
flag is L. To use a different Daily
Local Limit flag, type in a new one here. |
|
Compliance Asst. –
Exceeds Monthly Limit Flag |
The flag that appears for monthly averages that exceed the
monthly limits. The default flag is M. To use
a different monthly flag, type a new one. |
|
Compliance Asst. –
Exceeds 4 Day Average Limit Flag |
The flag for violations on 4-Day Average limits. The default flag is F.
To use a different 4-Day flag, type a new one. |
|
Compliance Asst. –
Exceeds TRC Limit |
Flag for samples that exceed the Technical Review
Criteria. The default flag is T. To use a different TRC flag, type a new one. |
|
Compliance Asst. –
Exceeds TRC 33 % |
Flag for SNC Summary parameters that are TRC and > 33%.
The default flag is ***. To
use a different TRCSNC flag, type a new one. |
|
Compliance Asst. –
Exceeds Chronic 66% |
Flag for SNC Summary parameters that are chronic. The
default flag is +++. Type
a new flag if desired. |
|
Improper Collection
Method Used Flag |
The flag for
samples that were collected with a different method than what is set in the
monitoring point for that parameters. Default flag is C. To use a different one, type a new one. |
|
Hold Time Exceeded
Flag |
The flag for
samples that exceed the recommended hold time for the testing method. The default flag is H. To use a different flag, type a new one. |
|
Non-Detect (ND)
Multiplier |
Multiplication factor used to calculate Adjusted Results
and averages when Concentrations are < or ND. |
|
Create Sample
Schedule From |
When creating a new Samples requirements schedule, this
date is used as the beginning of the calendar for making the schedule. |
|
Forecast Sample
Schedule (Months) |
When creating and maintaining a Samples requirements
schedule, this value sets how many months into the future to schedule. |
|
Base Hold Times
Calculations on: |
What date should be used for determining Hold Time
Exceedances? Choices are: Start Date Sampled or End Date Sampled. |
|
Use Results
exceeding Hold Times in Compliance? |
When entering data in Results, if the Result exceeds the
hold time, should it still be marked for use in Compliance, Yes or No? |
|
4 Day Average Start
Date |
Do you want your 4 day average to begin at a different
time then the selected reporting period in the compliance assistant? Simply add that start date here. This start date is used in the Compliance Assistant. |
|
Use this Format for
Avg. Decimal Places |
When Linko calculates Sample Averages, Monthly Averages, 4
Day Averages, or Significant Digit Mass Results, how many decimal places
should be used in the final values. |
|
Calculate Compliance
Using: |
What Result Date should be used for Gathering and
Calculating Parameter Compliance in Compliance Assistant?
Choices are End Date Sampled or Start Date Sampled. |
|
SNC: Both EPA and Local Limit Exceeds as: |
This setting affects the SNC reports in Compliance Assistant.
When Local Limits are enabled, and a Result exceeds both the Categorical /
EPA limit and the Local Limit, should Compliance Assistant count it as “One
Violation” or as “Two Violations”? |
|
Mass Base
Loading Calculations |
This section is not available if MASS is not enabled. |
|
Use ‘<’ sign for
Mass Results on Conc. ND? |
If a Mass Result is calculated on a concentration Result
of ND or <#, should a ‘<’ sign be placed in front of the Mass Result? |
|
Calculate Mass Using
Significant Digits? |
Use significant digit calculations when calculating Mass
Results? If ‘No’, then basic rounding
is applied based on Decimal Places above. |
|
Treat Flow Digits
for Sig Math as: |
This selection is only available when the “Use Significant
Digits” is set to YES. Allows users to select how Linko will treat the FLOW
digits. Selections are: Assume all
flow digits are significant digits, Include Flow when determining mass
significant digits, or Ignore Flow when determining mass significant digits. |
|
Mass Base – Pounds
Conversion Factor |
Allows the user to customize what value to use for the Pounds / day factor in mass calculations. |
|
Buttons |
Action performed |
|
New |
Create a new Lab Fee structure. |
|
Edit |
Edit an existing Lab Fee. |
|
Save |
When finished creating or editing click to save your changes. |
|
Close |
Closes the form to return to the Samples and Results
Administration screen. |
|
Cancel |
Stop the editing you are doing without saving any changes. |
|
Delete |
Delete the selected Lab Fee. |
|
New / Edit |
Click to add a new or edit an existing Parameter listed in the Lab Fee. |
|
Load
Parameters |
This will load ALL the parameters that are listed in the Linko Parameters tab in Samples and Results Administration. |
|
Copy
Lab Fees |
If you have another similar Lab Fee already set up you can copy the lab fees from that one and use it to start another. |
|
Done / Cancel |
Click on Done when you have finished entering the Parameter information. Click on Cancel to exit the Parameter input or edit mode without saving changes. |
|
Delete |
Remove the highlighted Parameter from the listing. |
|
Lab Code |
Use the dropdown listing to select which of the Laboratories the Lab Fee Schedule will be for. |
|
Date Effective |
Each Lab Fee is applied to samples in its date range. The Date Effective is the first date of the range of samples it will be applied to. |
|
Date Retired |
When you no longer use a Lab Fee use the Date Retired to close out the date range the Lab Fee was used for. |
|
Invoice by Group |
Click in this box to make Lab Group, Group Fee and Alternate Desc become available. Then make a Group of Parameters with one Lab Fee for the group. |
|
Lab Group |
Type in or choose from the DropDown the name of the group of parameters. |
|
Group Fee |
How much does the lab charge to process the parameters tested in this group. |
|
Alternate Desc |
Additional information to describe what is being tested in the group of parameters. |
|
Buttons |
Action performed |
|
Close |
Closes form without saving any changes. |
|
Save
Configurations |
Applies the changes that were made. |
|
Add New |
Under each Tab you add a member to that Table Listing by
using Add New. |
|
Details |
Under each Tab you edit / modify member of that Table
Listing by using Details. |
|
Tabs |
Description |
|
Enforcements |
Create Enforcement Types. |
|
Violations |
Create Violation Types to be used on the Violations
screens. |
|
Compliance Plans |
Use this Table
Listing to Create Full or Partial Compliance Plans for completing Enforcements by Selecting the Select Plan button to choose one or more Compliance Plans. Or Make Partial Plans
that you can piece together in different combinations. |
|
Configurations |
|
|
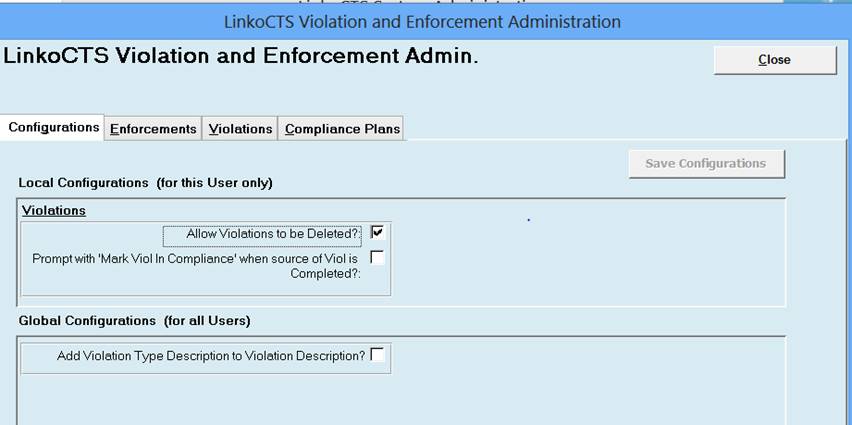
Local
Configurations |
For This User
Only |
|
Violations |
|
|
Allow
Violations to be Deleted? |
When checked, user can delete violations from the Violations
screen. |
|
Global
Configurations |
For All Users |
|
Add Violation Type
Description to Violation Description? |
When checked, the
Description of the Violation type as listed under the Violations tab will be
added automatically to the Description field in a newly created Violation
record. The user can choose to leave the Violation Type Description out of
the Violation Record Description by Unchecking this box. |