- Site Info displays site information for the Industry/Permit, such as address and site coordinates.
- Account Info displays account information for the Industry/Permit, such as Classification, Metering, Hours, etc.
- Industry Dates displays date information for the Industry/Permit, such as Effective Date, Application Date, and various frequencies.
- Monitoring Points lists the monitoring points for this Industry/Permit.
- Notes lists the notes associated with this Industry/Permit.
- Attachments lists the files attached to this Industry / Permit.
- Contacts lists the contacts for this Industry/Permit.
- Events lists any events and violations for this Industry/Permit.
- Codes displays the SIC, CAT, and NAICS codes assigned to this Industry/Permit.
NOTE: Dynamic System Labels -- When looking at the screen, you will see italicized labels, those labels can be renamed and re-purposed.
|
Item |
Description |
|
Industry No |
The main identifier for
the Industry (may also be the Permit #);
required field |
|
Industry |
The name of this
Industry (may also be the Permit Name); required field |
|
Industry Alias |
This field shows on the
Change of Custody forms in Sampling Assistant, allowing the POTW to keep the
identity of the Industry secure. |
|
Site ID |
Identifier for the Site
and Location of the business. Note: A single site may have many industries/permits
associated with it. Use Choose a Site
in edit mode to choose a pre-existing site for an industry. Use Site Management to create a new
Site. |
|
Address |
The first line of the
Site’s physical address |
|
Address (cont.) |
The second line of the
Site’s physical address |
|
City |
The name of the city where this Industry Site is located. |
|
State |
The state where this
Site is located |
|
Zip code |
The Zip Code or Postal
Code for the Site’s location |
|
GIS ID |
|
|
East/West |
East/West (X) grid coordinates |
|
North/South |
North/South (Y) grid coordinates |
|
Site Elevation |
This location’s elevation |
|
Map Category |
Map
Category for this Site. Create Groups
for each section of your town/city to coordinate your sampling and inspection
visits and save driving time. Type in a new Map Category or select a Map
Category that has already been entered. |
NOTE: Dynamic System Labels will be italicized and
can be Edited.
|
Item |
Description |
|
Active Industry |
Defaults to active;
change field to ‘No’ when the industry is no longer in business and you wish
to remove the industry from your list views.
You must also adjust ‘Visible
Industries’ to ‘Active Industries’ in ‘System Administration’. |
|
Permitted Industry |
Is this Industry
permitted to discharge to the Treatment Plant? Yes or No. |
|
Batch Discharge |
Does this Industry batch
discharge? Yes or No. |
|
Annual Fee |
The Permit fee amount
billed to the user, if any. This field appears on several Industry Reports. |
|
Classification |
What type of Industry is
this? E.g. Metal Fabrication, Chemical
Research, Categorical, Significant, etc.
Classifications may be added to the list via Industry
Administration Section. |
|
Secondary Class |
A second classification
describing the Industry; may be utilized in conjunction with “Classification”
to group Industries in a more specific manor. E.g. Classification =
Categorical, Secondary Class = Electroplater. |
|
Compliance Status |
A Compliance Status can
be assigned to an Industry based upon their status in a Violation and
Enforcement proceedings. This field is managed in Industry
Administration. |
|
Hours |
Hours of operation for
this Industry. Tracking this
information will help you to get a feel for what their production hours are
and how often to monitor them. |
|
Square Feet |
Square feet at this
Industry’s location |
|
Number of Employees |
Number of employees at
this Industry |
|
Non-working Hrs. |
Hours when the plant is not in operation |
|
Daily Flow |
This Industry’s
estimated average daily flow (permit info) |
|
Meter Number |
Meter number for this
Industry |
|
Sewer Account |
Sewer Account number for
this industry |
|
POTW Personnel |
POTW Personnel assigned
to work with this Industry |
|
Trunk Line |
Identify what trunk line
the industry is discharging to. To track
the industries on a specific trunk line, build a “Group” on Trunk Line and
print out a report. |
|
Receiving Plant |
When monitoring more
than one WWTP, identify each industry’s Receiving Plant. Simply type the plant name in or select one
from the list. |
|
Item |
Description |
|
Effective Date |
The date the permit becomes effective, used as the default date effective for monitoring point limits. |
|
Application Date |
Track the Permit Application Date for the Industry |
|
In Business Since |
The date the Industry opened. (may be used in grandfather clauses) |
|
Close Date |
The date that the industry ceased operations. |
|
IU Sampling Freq |
The frequency with which the Industrial User should sample; used for creating subsequent events when an event is completed if ‘Create Follow-Up Events How?’ is set to ‘Prompt’ or ‘Automatically’ in Event Administration. Auto Scheduler also uses this field when generating events. |
|
Authority Sampling
Freq |
The frequency with which the Authority should sample; used for creating subsequent events when an event is completed if ‘Create Follow-Up Events How?’ is set to ‘Prompt’ or ‘Automatically’ in Event Administration. Auto Scheduler also uses this field when generating events. |
|
IU Reporting Freq |
The frequency with which the Industrial User should file a compliance report with the Authority; used for creating subsequent events when an event is completed if ‘Create Follow-Up Events How?’ is set to ‘Prompt’ or ‘Automatically’ in Event Administration. Auto Scheduler also uses this field when generating events. |
|
Inspection Freq |
The frequency with which the Authority should inspect the Industry; used for creating subsequent events when an event is completed if ‘Create Follow-Up Events How?’ is set to ‘Prompt’ or ‘Automatically’ in Event Administration. Auto Scheduler also uses this field when generating events. |
|
Expiration Date |
The date the permit expires. This value is taken from a Permit Expiration Event in Event Management that is associated with this Permit and cannot be edited here. |
|
Invoice Date |
The date of the permit’s next invoice. This value is taken from a Permit Invoice Event in Event Management that is associated with this Permit and cannot be edited here. |
|
Last Renewal |
The date for the permit’s last renewal. This value is taken from a Permit Renewal Event in Event Management that is associated with this Permit and cannot be edited here. |
|
Next Renewal |
The date for the permit’s next renewal. This value is taken from a Permit Renewal Event in Event Management that is associated with this Permit and cannot be edited here. |
|
Last Inspection |
The date of the last inspection for this permit. This value is taken from the last completed Inspection Event in Event Management that is associated with this Permit and cannot be edited here. |
|
Next Inspection |
The date of the next inspection for this permit. This value is taken from the next scheduled Inspection Event in Event Management that is associated with this Permit and cannot be edited here. |
- Add a new Monitoring Point - Click on the Add New hyperlink to open the Monitoring Point Details screen. Fill in the Monitoring Point Abbreviation and a Description. After you have added and saved the information, it will appear in the list view of this tab.
- View/Modify - click on the Details button of the Monitoring Point of interest. Once the Details screen has been opened, you have the ability to modify, delete or simply view the material.
- View Local Limits - access the Local Limit information for this Industry by clicking on the View Local Limits button under the Monitoring Points tab.

|
Buttons |
Action performed |
|
Add New |
Opens Monitoring Points
screen allowing you to create a new Monitoring Point |
|
Details |
Opens Monitoring Points screen
displays selected Monitoring Point |
|
Item |
Description |
|
Monitoring Point |
Name of the Monitoring
Point |
|
Date Issued |
Date this Monitoring
Point was issued |
|
Description |
Description of the
Monitoring Point |
|
Attachments? |
A YES in this file
indicates that a file has been attached to the Monitoring Point. |

Adding Monitoring Point Limits - From the Monitoring Points Details Screen, add a new Parameter Limit by clicking on the Add New hyperlink in the LinkoCTS Parameter Limits section to open the Monitoring Point Limit Details screen.
|
Selection |
Description |
|
Industry No |
Industry No of Industry whose Monitoring Points are being displayed |
|
Industry Name |
Name of Industry whose Monitoring Points are being displayed |
|
Buttons |
Action performed |
|
Copy Limits |
Opens Copy Monitoring Point Limits screen. This screen allows you to copy limits from a different Monitoring Point to this one. |
|
Retire Limits |
Prompts the user to enter a date from which to Retire all the Limits for the Monitoring Point.
You should retire all Limits if you are no longer going to be using a Monitoring Point and you are using the “Create Schedule” function. This way no Schedule of Sampling is created for the MP you have retired. |
|
Create Schedule |
Creates the Sampling Schedule for use in Reports in Compliance Assistant and in creating COCs when used with Sampling Assistant.
|
|
New |
Clears values and allows you to create a new Monitoring Point. While editing, the New, Edit, Close, and Record Selector buttons will be disabled. |
|
Edit |
Allows you to edit the displayed Monitoring Point. While editing, the New, Edit, Close, and Record Selector buttons will be disabled |
|
Save |
Saves the changes made to the Monitoring Point |
|
Close |
Closes the screen |
|
Cancel |
Cancels any changes made to the Monitoring Point |
|
Delete |
Deletes the selected Monitoring Point from the system. This button is disabled by default. The ability to delete can be enabled/disabled from the Configurations Tab in Industry Administration. Plan carefully as deleting a monitoring point permanently deletes ALL associated data. |
|
Record Selectors |
Standard Record Selectors allowing you to move between selected Monitoring Points for that Industry (if more than one). |
|
Status Bar |
Standard Status Bar allowing you to jump to a listing of Violations without enforcements, a listing of overdue Events, a listing of related Reports, a Calendar, a Calculator, Contact Information, or a new Phone Log Event |
|
Item |
Description |
|
Wastewater Type |
Wastewater type at this Monitoring Point |
|
Measure Device |
Flow Measurement device used for this Monitoring Point |
|
Has Electricity |
Is there Electricity available at this Monitoring Point? Yes or No |
|
North/South |
North/South (Y) grid coordinates for this Monitoring Point |
|
East/West |
East/West (X) grid coordinates for this Monitoring Point |
|
Elevation |
Elevation of this Monitoring Point |
|
Attachment and BROWSE |
The Attachment Checkbox indicates that a file has been attached to this Monitoring Point. Use the BROWSE control to open the Attachment Preview screen where you can view attachments or add new ones. |
|
General Description |
Short description of this Monitoring Point |
|
Sampling Notes |
Notes about how samples are taken from this Monitoring Point |
|
Safety Notes |
Safety notes about this Monitoring Point |
|
Parameter Limits |
|
|
Add New |
Opens the Monitoring Point Limits screen to create a new Parameter Limit. A new Parameter Limit can also be created within any Monitoring Point Limits Details using NEW. |
|
Sort Order |
Provides the ability to sort the Parameters based upon the Sort Order number assigned under the Parameter Details in Samples and Results Administration. |
|
Parameter |
The pollutant parameter name |
|
Units (Con) |
The concentration unit of measurement for this parameter |
|
Daily Limit (Con) |
The concentration daily limit for this parameter |
|
Daily Type (Con) |
The type of daily limit, e.g. local, categorical, state, etc. |
|
Monthly Limit (Con) |
The concentration monthly limit for this parameter |
|
Monthly Type (Con) |
The type of monthly limit, e.g. local, categorical, state, etc. |
|
Date Effective |
The date these limits became effective |
|
IU Sampling
Frequency |
The frequency at which the parameter should be sampled by the Industry. |
|
Auth Sampling
Frequency |
The frequency at which the parameter should be sampled by the Authority (POTW). |
|
Daily Limit
(lbs./day) |
The lbs./day daily limit (Mass Base Loading must be enabled to see this field) |
|
Monthly Limit
(lbs./day) |
The lbs./day monthly limit (Mass Base Loading must be enabled to see this field) |


Assign Parameters and Limits to the Monitoring Point.

|
Selection |
Description |
|
Industry No |
No of Industry whose
Monitoring Point Limits are being displayed |
|
Industry Name |
Name of Industry whose
Monitoring Point Limits are being displayed |
|
Monitoring Point |
The identifying name or
number for the Monitoring Point whose limits are being displayed |
|
Date Issued |
The issue date for the
Monitoring Point whose limits are being displayed |
|
Buttons |
Action performed |
|
New |
Clears values and allows
you to create a new Monitoring Point Limit.
While editing, the New, Next, Edit, Close, and Record Selector buttons
will be disabled |
|
Edit |
Allows you to edit the
displayed Monitoring Point Limit.
While editing, the New, Next, Edit, Close, and Record Selector buttons
will be disabled |
|
Save |
Saves the changes made
to the Monitoring Point Limit. Only
enabled while editing or creating an entry |
|
Next |
Displays the next
Monitoring Point Limit |
|
Close |
Closes the screen |
|
Cancel |
Cancels any changes made
to the Monitoring Point Limit. Only enabled while editing or creating an
entry |
|
Delete |
Deletes the Monitoring
Point Limit |
|
Record Selectors |
Standard Record
Selectors
allowing you to move between Parameters. |
|
Status Bar |
Reduced Status
Bar
allowing you to view a Calendar, a Calculator, Contact Information, or create
a new Phone Log Event |
|
Item |
Description |
|
Parameter |
The pollutant parameter
name. Where can I add a new parameter
or change an existing one? In the Sample Administration
Section. |
|
Date Effective |
The date these limits
became effective |
|
Date Retired |
The Date the Limit is no
longer in effect. |
|
Collection Method |
The method to be used
when taking a sample for this parameter |
|
IU / Authority Sample Frequency |
The frequency at which
the parameter should be sampled. The
fields are for reference only and are not flagged as a violation if the
parameter is not sampled according to the frequency noted here. Reports generated in Compliance Assistant
indicate required vs. actual IU Sample Frequency based upon these settings. |
|
Mon Point Avg Type |
The type of average for
the Parameter. The default is "MO" for monthly averages. You can select "F" for Four-Day
Averages (used for older electroplaters).
This setting is
informational and affects no other part of the software. To change the
average that is used for Compliance, change the Average Type in Compliance Assistant. The Four-Day
average will group samples by fours, then calculate the average of those 4
samples. |
|
Concentration Units |
The concentration unit
of measurement for this parameter |
|
Daily Limit |
The concentration daily
limit for this parameter |
|
Daily Type |
The type of daily limit,
e.g. local, categorical, state, etc. |
|
Monthly Limit |
The monthly (sometimes
is an average) limit for this parameter |
|
Monthly Type |
The type of monthly limit
or average, e.g. local, categorical, state, etc. |
|
Mass Units |
This
field is non-editable because the software will only produce mass
calculations for Pounds per Day (ppd) (This field is displayed only when the
Linko Feature “Mass Based Calculations” is enabled.) |
|
Mass Daily Limit |
The
mass daily limit (This field is displayed only when the Linko Feature “Mass
Based Calculations” is enabled.) |
|
Mass Monthly Limit |
The
mass monthly or average limit (This field is displayed only when the Linko
Feature “Mass Based Calculations” is enabled.) |
Easily copy limits from one Monitoring Point to another.

|
Buttons |
Action performed |
|
Apply |
Copies monitoring point
limits from selected Source Monitoring Point |
|
Cancel/Close |
Closes window without
copying any monitoring point limits |
|
Item |
Description |
|
Create New Limits for: Industry |
Industry that Monitoring
Point Limits will be copied to. This is a non-editable field and simply lists
the current Industry being modified. |
|
Create new Limits for Monitoring Point |
Monitoring Point that
Limits will be copied to. This drop
down box lists all Monitoring Points for the current Industry being edited. |
|
Copy Compliance Limits from: Source Industry |
Industry that contains
the Monitoring Point that Limits will be copied from. This drop down box lists all Industries. |
|
Copy Compliance Limits from Source Monitoring
Point |
Monitoring Point that
the Monitoring Point Limits will be copied from. This drop down box lists all Monitoring
Points for the selected Source Industry. This field will remain grey until
the Source Industry is selected. |
This feature allows you to enter a detailed breakdown of a waste stream for each monitoring point. This is used to identify process (categorical) vs. non-process flows, allows you to identify the correct EPA Category for the limits assignment to this Monitoring Point and allows you to populate the Industries permit with the detailed waste stream information.
|
Items |
Description |
|
Effective Date |
Date the waste stream breakdown took effect |
|
End Date |
Date the waste stream breakdown is retired |
|
Waste Stream Description |
Human-readable description of waste stream |
|
Avg Flow |
System calculation of waste stream flow average |
|
Unit |
The Avg Flow units of either gpd or mgd |
|
Production Rate |
Rate of waste stream production |
|
Unit |
Production Rate unit of measure |
|
Production Information |
Human-readable description of waste production type |
|
Included In Avg Flow |
A checkbox telling system to use in Avg Flow calculations |
|
Waste Stream Component |
Dropdown to choose what type of waste stream |
|
Process Description |
Dropdown of Continuous, Batch or Intermittent |
|
RUD/C |
Dropdown of Regulated, Unregulated, Dilute or Cyanide |
|
Avg Flow |
Avg Flow of individual Stream Detail record |
|
Max Flow |
Max Flow of individual Stream Detail record |
|
Comments |
Human-readable optional comment field |
For a waste stream:
- Only one record can be in effect at a time.
- You must enter end date of previous record before creating a new record
- You can use the Copy Stream feature to copy data from old/retired stream and create a new one
- Waste Stream Desc, Production Information and Comments are text entry, 255 characters max
- Effective Date required
- End Date is required before creating a new record.
- Avg Flow at Waste Stream level cannot be edited, this is calculated and stored in the field based on Avg Flow entered into each Waste Stream Component when the Include field is checked.
- Flow Unit in Waste Stream Breakdown is limited to gpd and mgd.
- Any unit for Prod Rate Unit is valid
- A self-Lookup is used for Waste Stream Component. Meaning, whatever value you entered for a previous industries Component will be in this list for you to choose when you enter the next Component.
- Process Description is fixed values: Continuous, Batch, Intermittent
- RUD/C is a fixed list: Regulated, Unregulated, Dilute, Cyanide.

Waste Stream Details were added to these reports.
|
Area of Software |
Report Title |
|
Groups and Queries - Industry Groups |
Industry (Contacts and MonPoint Limits) |
|
|
Industry (Contacts, Recent MonPoint Lims) MB |
|
|
Industry (Contacts, Recent MonPoint Lims) |
|
Industry Management |
Industry (Contacts and MonPoint Limits) |
|
|
Industry (Contacts, Recent MonPoint Lims) MB |
|
|
Industry (Contacts, Recent MonPoint Lims) |
|
Industry List View |
Industry (Contacts and MonPoint Limits) |
|
|
Industry (Contacts, Recent MonPoint Lims) MB |
|
|
Industry (Contacts, Recent MonPoint Lims) |
We also added new reports and letters to Monitoring Point Details that show waste stream details.
An example of one report is listed here:

NOTE: The Waste Stream details can be included in Permits generated using Permit Writer. SEE Permit Writer Userguide for more information

- Create a new Note for an Industry - click on the Add New under the Notes Tab to open the Industry Notes Detail screen. Choose a Note Type and fill in the description.
- View/Modify - To view more comprehensive Note Information from the list view, click on the Details button. Once the Details Screen has been opened, you have the ability to modify, delete or simply view the data.
- To make any changes, you must first click on the Edit Button and when the changes are complete, you must click on the Save button.
|
Buttons |
Action performed |
|
Add New |
Opens Industry Notes screen allowing you to create a new Note |
|
Details |
Opens Industry Notes screen displaying selected Note |
|
Item |
Description |
|
Notes Type |
Type of note this is, such as HazMat or Spill or Process |
|
Industry Notes |
Actual notes, such as information about the hazardous materials stored at this industry (for HazMat Note Type) or a description of the site’s Spill Plan (for Spill Note Type) |

|
Selection |
Description |
|
Industry No |
No of Industry whose
notes are being displayed below |
|
Industry |
Name of Industry whose
notes are being displayed below |
|
Buttons |
Action performed |
|
New |
Clears values and allows
you to create a new Note. While
editing, the New, Edit, Close, and Record Selector buttons will be disabled |
|
Edit |
Allows you to edit the
displayed Note. While editing, the
New, Edit, Close, and Record Selector buttons will be disabled |
|
Save |
Saves the changes made
to the Note |
|
Close |
Closes the screen |
|
Cancel |
Cancels any changes made
to the Note |
|
Delete |
Deletes the Note |
|
Record Selectors |
Standard Record Selectors allowing you to move between displayed
Notes for the selected Industry. |
|
Status Bar |
Reduced Status Bar allowing you to
view a Calendar, a Calculator, Contact Information, or create a new Phone Log
Event. |
|
Print |
Clicking on PRINT will print a Note Details
report that includes the document link if it exists. |
|
Item |
Description |
|
Note Type |
Type of note this is,
such as HazMat or Spill |
|
Desc. of Note Type |
Description of this Note
Type. Keep in mind that this list is
updateable either here or in the Industry Administration
Section |
|
Notes/Documentation |
Actual notes, such as
information about the hazardous materials stored at this industry (for HazMat
Note Type) or a description of the site’s Spill Plan (for Spill Note Type) |

1.
Attach New (Facility) File allows
you to attach a file to this Industry/Facility
2.
![]() - click this button to open the Attachment Preview screen
- click this button to open the Attachment Preview screen
3.
![]() - click this button to open the file so it can be edited
or printed
- click this button to open the file so it can be edited
or printed
4.
![]() - click this button to delete the attached file. It will be permanently deleted
- click this button to delete the attached file. It will be permanently deleted
5. Record Types drop down list allows you to filter the list of attachments to see specific types of attachments. Examples include:
i. Facility – this would be an attachment added under the Attachments Tab above.
ii. Monitoring Points – an attachment that was added to the Monitoring Point via the Monitoring Point and Limits screen.
iii. Permit Events – an attachment added to a Permit Event.
iv. Inspections – an attachment added to an Inspection Event
See Using Attachments in the Common Features area of this guide for more details.
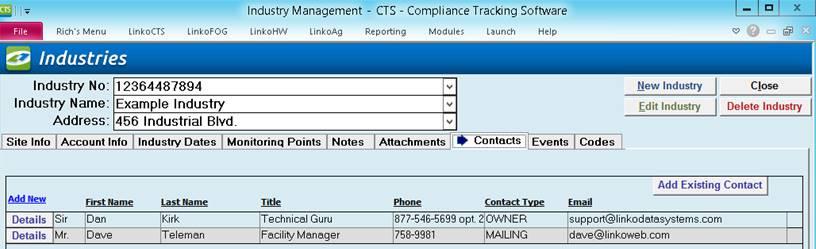
- Industry Contacts - From the Status Bar you can quickly look up any Industry Contact you would like. A full list of information will be displayed. Simply start typing in the Contact’s last name and the software will jump to it.
- Industry Contacts can also be viewed on the Contacts Tab in Industry Management. A Contact is automatically created for each Industry without full information when you create a new Industry. You should then complete this Contact using the information for that Industry as the contact information is used on several reports.
- This is user configurable at Industry Administration Section, Configurations, Local Configurations, “Auto-Create a New Contact when Creating a New Industry.”
- You should create a
contact for each Industry with a Contact Priority of 1, the contact
information is used on several reports and letters and they may not be
printed out for an Industry if a contact with priority 1 does not exist
for that Industry. Feel free to
add new contact types and modify existing ones in Industry Admin.
- Add New - Use the
familiar Add New link to create a new contact. The company name and address are
automatically loaded from the Site Information from the Industry.
- View or Modify - To view more comprehensive Contact information from the list view, click on the Details button. Once the Details Screen has been opened, you have the ability to modify, delete or simply view the data.
a. To
make any changes, you must first click on the Edit
Button and when the changes are complete, you must click on the save button.
- Add Existing Contact –
Use this to add a contact to this company that already exists as a contact
for another company. This will
associate that contact to both so that if you edit the contact information
in one place, it is updated in both places.
|
Buttons |
Action performed |
|
Add New |
Opens Industry Contacts screen allowing
you to create a new Contact |
|
Details |
Opens Industry Contacts screen displaying
selected Contact |
|
Add Existing Contact |
Open Choose Contact screen to select an
existing Contact |
|
Item |
Description |
|
(Salutation) |
|
|
First Name |
First name of this
contact |
|
Last Name |
Last name of this
contact |
|
Title |
Title for this contact,
for example ‘Director of Operations’ or ‘President’ |
|
Phone |
Phone number of this
contact |
|
Contact Type |
Type
of contact for this Industry, for example Legal or Mailing |
|
Email |
Email address for this
contact |

|
Selection |
Description |
|
Industry No |
No of Industry whose
notes are being displayed below |
|
Industry |
Name of Industry whose
notes are being displayed below |
|
Buttons |
Action performed |
|
New |
Clears values and allows
you to create a new Contact. While
editing, the New, Edit, Close, and Record Selector buttons will be disabled |
|
Edit |
Allows you to edit the
displayed Contact. While editing, the
New, Edit, Close, and Record Selector buttons will be disabled |
|
Save |
Saves the changes made
to the Contact |
|
Close |
Closes the screen |
|
Cancel |
Cancels any changes made
to the Contact |
|
Delete |
Deletes the Contact |
|
Record Selectors |
Standard Record Selectors allowing you to move between
contacts for the selected Industry. |
|
Status Bar |
Reduced Status Bar allowing you to view a Calendar,
a Calculator, Contact Information, or create a new Phone Log Event. The Print
Button will print a report for any Details screen that has a report
associated with it. |
|
Item |
Description |
|
Salutation |
Salutation for this
Contact, for example ‘Dr.’ or ‘Mr.’ |
|
Contact Priority |
Priority for this
Contact. Keep in mind that there has
to be at least one contact with a priority of 1 |
|
First Name |
First Name of this
Contact |
|
Last Name |
Last Name of this
Contact |
|
Contact Type |
Type of contact for this
Industry, for example Shipping, Legal, Mailing Contact, etc. |
|
Company Name |
Name of Contact’s
Company. (Most likely the name of the industry) |
|
Address 1 / 2, City, State, Zip |
Full Address information
for the Contact |
|
Title |
Title for this Contact,
for example ‘Director of Operations’ |
|
Phone |
Business phone number
for this Contact |
|
Fax |
Fax phone number for
this Contact |
|
E-Mail |
Email address for this
Contact |
|
Cell
Phone |
Cell phone number for
this Contact |
|
Pager |
Pager number for this
Contact |
|
Emergency
Phone |
Emergency phone number
for this Contact |
|
Notes |
Comments about this
Contact |

|
Adding New Events |
Clicking on the <Add
New> link opens the Event Pick Box. First Choose an Event Category and Type and
click Ok. This opens the Events
Details screen for that Event Type and Category. Fill in all of the
information you can for the event item and save it. After you have added and saved the
information, it will appear in the list view under the Events Tab. Add new
event types and modify existing ones in Event Administration
Section. |
|
View |
Using the Event Category drop down box, choose the event
category to filter by. If you would
like to see all of the events for the Industry regardless of category, select
ALL. |
|
View/Modify |
To view more comprehensive schedule information from the list view, click on the Details button. Once the Details Screen has been opened, you have the ability to modify, delete or simply view the data. To make any changes, you must first click on the
<Edit> Button and when the changes are complete, you must click on the
save button. |
|
Buttons |
Action performed |
|
Event Category |
Combo box offering a choice of Event Categories, or All, to be displayed in the list below |
|
Add New |
Opens New Event Pick Box window for this Industry and allows you to choose the type of Event you want to create. Once you choose an Event Category and Event Type, an Edit Event window opens for the appropriate Event Category. Event Category options are COC, Generic Event, Inspection Event, Permit Event, PumpOut and Sample Event |
|
Details |
Opens appropriate Edit Event window for selected Event: COC, Generic Event, Inspection Event, Permit Event, Sample Event, and Violation |
|
Item |
Description |
|
Category |
The Event Category for this event |
|
Event Type |
Type of Event. This is user editable in (system admin) |
|
Description |
Description of this event. If you double click on this field a pop-up window will open allowing you to view the full text. Any edits you make in this pop-up window will NOT be saved |
|
Due Date |
The date this Event is scheduled to be completed |
|
Completed Date |
The date that this Event was actually completed |
|
Violation |
Indicates if the Event
has a Violation associated with it. Double-clicking a blank Violation field
for an event will allow you to create a Violation for that event.
Double-clicking a red YES will open Violation Management
showing the Violation associated with the event. |

|
Clicking on the<< Edit Button>> opens
the Facility Codes Details Screen.
Choose your Code either by the code itself or by the description and
click on the Add Button. To remove a code association from the list click on
the <<Remove>> Button. Add new codes and modify existing ones in
our Industry Administration Section. |
|
|
Description |
|
|
Associated SIC Codes |
List of all SIC codes
associated with this Industry/Permit.
Keep in mind that this list is updateable in the Industry Administration Section. |
|
Edit (SIC
Codes) |
Opens Assign SIC
Codes window allowing
you to change the SIC codes associated with this Industry/Permit. |
|
Associated CAT Codes |
List of all CAT codes
associated with this Industry/Permit. Keep in mind that this list is
updateable in the Industry Administration Section. |
|
Edit (CAT
Codes) |
Opens Assign CAT Codes window allowing you to change the CAT
codes associated with this Industry/Permit. |
|
Associated NAICS Codes |
List of all NAICS codes
associated with this Industry/Permit. Keep in mind that this list is
updateable in the Industry Administration Section. |
|
Edit (NAICS
Codes) |
Opens Assign NAICS Codes window allowing you to change the NAICS
codes associated with this Industry/Permit. |
|
Associated Misc. Codes |
List of all Misc. codes
associated with this Industry/Permit. Keep in mind that this list is
updateable in the Industry Administration Section. Misc. Codes are created
by the POTW and customized based upon your Program’s needs. |
|
Edit (Misc.
Codes) |
Opens Assign NAICS Codes window allowing you to
change the NAICS codes associated with this Industry/Permit. |

|
Item |
Description |
|
Close |
Closes window. |
|
Add |
Adds the Code on the
left to the list of Codes associated with this Permit/Industry |
|
Remove |
Removes the Code
selected in the list below |
|
NAICS – SIC – CAT
by Code |
Drop-down listing NAICS
– SIC – CAT Codes by their Code value. |
|
NAICS – SIC – CAT by Desc |
Drop-down listing NAICS
– SIC – CAT Codes by their Description. |
|
Limit Codes
to |
By entering a term in
this box and hitting enter or tab, you can limit the Codes listed in the drop
down boxes above |
|
Associated NAICS – SIC – CAT Codes |
A list of all the NAICS
– SIC – CAT codes associated with the Permit/Industry |
Industry List View provides sorting, grouping, and reporting on the Industries you select with the fields you configure. As of Version 10.1 of the LinkoCTS SQL version, this list view is User Modifiable in the “white” fields. The “grey” fields remain locked and cannot be updated by the Users. The information changed here will be shown in the Industry Management screens.

|
Item |
Description |
|
Industry Group |
Combo box offering a
list of Groups to quickly filter on.
This changes the industry information displayed below. |
|
Group/Filter |
This opens the Group or
Filter form that is used on all of the filtering screens. For more information regarding this Screen
go to Filter Form. |
|
Close |
Closes the screen,
returns to the Main Menu. |
|
Cancel |
Exits any data entry you
may have started without saving. |
|
Add New |
Opens Industry Management Edit window
allowing you to create a new Industry/Permit. |
|
Action
Menu –Config Layout |
Set up the List View
with any of the Industry related fields you choose to shown via the Configure layout. |
|
Action
Menu – Excel Preview |
Excel preview will take
your current list view and create a spreadsheet view you can export to Excel. |
|
Record Selectors |
Standard Record Selectors allowing you to move between
Parameters. |
|
Status Bar |
Reduced Status Bar allowing you to view a Calendar,
a Calculator, Contact Information, or create a new Phone Log Event |
|
Quick Filter Functionality |
Access the Quick Filter function by a Right Click on a
field of interest and sort for and select just the records you want to
display. |