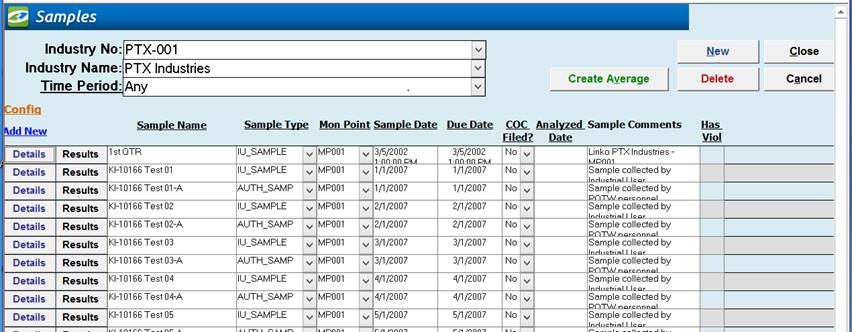
Sample Management View
|
View Samples for an Industry |
Use one of the pull-down boxes labeled <Industry No> or <Industry Name> to select an Industry. When you select an Industry, the samples for that Industry will appear on the screen. |
|
Add a New Sample |
Click the New button. Complete each of the fields on the Samples Details Screen with appropriate information - you must fill in the columns with red labels. Click the Save button to Save or the Cancel to abandon the addition. |
|
Data Entry |
Enter information on a new Sample right here at the Sample Management screen without going into the Sample Details. This speeds data entry. |
|
Sample Sorting |
Samples are listed most recent on top, and you can use the scroll bar on the right hand side of the screen to view samples at the bottom if you have that many. You can change the sorting of the screen by clicking on a column header. |
|
Modifying Samples |
To change information in a sample, simply click on the Details button (the “S” Button), to open the Details Screen, click on the Edit Button and modify the field of interest. |
|
Save / Cancel |
Use the Save button to save or the Cancel button to abandon your changes. |
|
Delete Samples |
To delete a sample, select the Sample by clicking in one of the fields. Next click on the Delete button. If there are violations or other events associated with that sample you may be required to delete those items prior to deleting the current sample. |
|
Sample Date Checking |
If the Sample Date
entered is 3 days more or less than either the Start Date Sampled or End Date
Sampled then a message is displayed to notify the user. The date is allowed, but the user is
notified. This is a data
input check. |
|
Auto schedule next Sample |
Users can complete
the Sample Date, and when this date is entered, Follow-up Sample events are
created (Prompted or Automatically, depending on config settings). Now, when Samples are completed, the
MonPointID and Scheduled By values are also pushed to the follow-up event -
whether completed from the Samples list, Events list, or Sample Details
screens. |
|
Item |
Description |
|
Industry No |
Drop down box offering a
list of Industries by Industry No. These
changes the industry’s samples displayed below. If you know the Industry number then you can
simply start typing it in the drop down list.
The list will instantly jump to the Number. |
|
Industry Name |
Drop down box offering a
list of Industries by Name. This
changes the industry’s samples displayed below. If you know the Industry number then you
can simply start typing it in the drop down list. The list will instantly jump to the Number. |
|
Time Period |
Drop down box offering a
list of time periods. Choosing a time
period limits the samples displayed to the ones that have Sample Dates within
that time period. The user can create a Custom Date range (See the Custom Date explanation in the List and Details
View section of Common Features) or add / modify / delete Date Ranges
available in the listing via the Quick View tab of Event
Administration. |
|
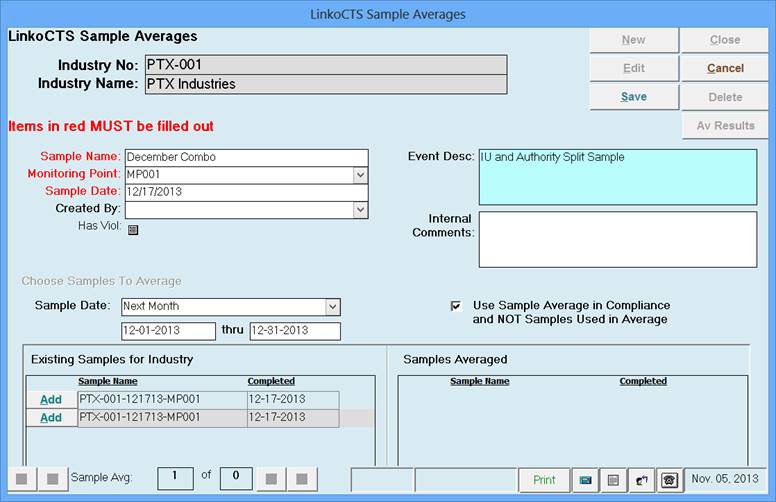
Create Average |
Opens Sample
Averages window allowing you to combine several
samples into one Sample Average value |
|
New |
Creates Input Row allowing
you to create a new Sample. |
|
Delete |
Allow you to delete a
Sample. |
|
Close |
Closes the screen,
returns to the Main Menu |
|
Cancel |
Allows you to exit out
of creating a New Sample. |
|
Samples button |
Opens Sample
Details screen
displaying the selected Sample |
|
Results button |
Opens Result List screen
displaying results for the selected Sample |
|
Sample Name |
Linko can enter the name
of the Sample, automatically or you can type your own in each time. Set the configuration in Samples Admin, “Auto-Fill Sample Name.” |
|
Sample Type |
What kind of Sample
event, Authority, Industry, Import, etc. |
|
Mon Point |
The Monitoring Point
where the Sample was taken |
|
Sample Date |
The date the Sample was
taken |
|
Due Date |
The date the Sample must
be completed by |
|
Sched By |
Who scheduled this
sample collection? e.g., the Authority
or the Industry. Use this field with your Sample if you plan to use
Compliance Assistant to check Samples just for the Industry or just for the
Authority. |
|
Sampler |
The person who collected
the Sample |
|
COC Filed |
Chain of Custody status. A check indicates that the COC is on file
with sample results. The “Auto-Check ‘COC Filed’
When Result NA’s Gone” in Samples and Results Administration, gives the user the option
of having Linko automatically select YES when all of the results are entered
for the Sample and there are no more results with NA values. Otherwise, this field shows
NO until the user chooses to change it to YES, indicating that the Sample is
complete. |
|
Sample Comments |
Comments about this
Sample |
|
Has Viol |
Whether or not there are
any violations associated with this Sample. Double-clicking this field when
it has a red YES will take you to the Violations Management screen.
Double-clicking this field when it is blank will ask you if you want to
Create a Violation. |
|
Record Selectors |
Standard Record
Selectors allowing you to
move between displayed Samples. |
|
Status Bar |
Standard Status Bar allowing you to
jump to a listing of overdue Events, a listing of related Reports, a Calendar, a Calculator, Contact
Information, or new Phone Log Event. |
|
Other Field Names and
Config |
The List View Configure Link Allows you to select
which fields are displayed, their order and settings. The Sample Management
screen has a variety of Fields that can be used including information about
who scheduled and completed the sample; and the analyzed date, comments and
sample document. |
|
Created By |
Shows the listing of
POTW employees from the Personnel Tab
in System Administration and one can be selected to indicate that person
created the Sample Record. |
|
Assigned To |
Shows the listing of
POTW employees from the Personnel Tab
in System Administration and one can be selected to indicate that the Sample
was assigned to them. |
|
Analyzed Date |
The actual date the
Sample was tested in the lab. |
|
Analyzed By |
Shows the listing of
POTW employees from the Personnel Tab
in System Administration and one can be selected to indicate who in the
authority did the testing (if applicable) |
|
Late |
If the Sample Date
exceeds the Due Date, this field will indicate YES that it was late. |
|
Used in Avg? |
Indicates whether this
sample is one of the samples used to calculate a Sample Average |
|
Internal Comments |
Your comment can be
entered here or in the Details screen for the Sample. (8000 character max) |
|
Sample Document |
A document can be
attached by double-clicking in this field, which opens a File Manager window.
This is the same function as the Browse button in the Details Screen for the
Sample. Once selected, Click on this button to open the file. |
|
Quick Filter |
Access the Quick Filter function by a Right Click on a
field of interest and sort for and select just the records you want to
display. |
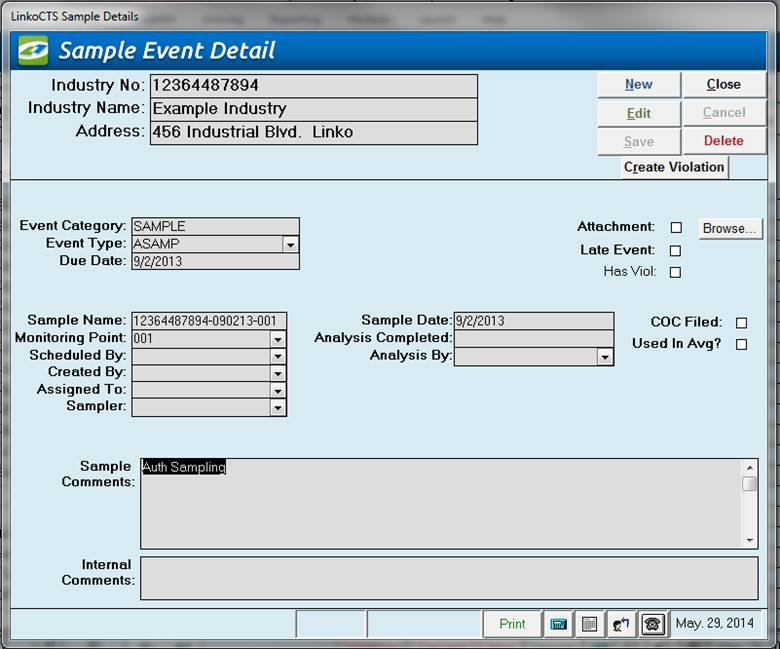
Sample Details
|
Item |
Description |
|
Industry No |
ID of Industry whose
Samples are being displayed below |
|
Industry |
Name of Industry whose
Samples are being displayed below |
|
Create Violation |
Opens Violation
Details
page allowing you to create a new Violation for this Sample |
|
New |
Clears values and allows
you to create a new Sample. While
editing, the New, Edit, Close, and Record Selector buttons will be disabled |
|
Edit |
Allows you to edit the
displayed Sample. While editing, the
New, Edit, Close, and Record Selector buttons will be disabled |
|
Save |
Saves the changes made
to the Sample. Only enabled while
editing or creating an entry |
|
Close |
Closes the screen |
|
Cancel |
Cancels any changes made
to the Sample. Only enabled while editing or creating an entry |
|
Delete |
Deletes the Sample. |
|
Event Category |
Samples are considered a
type of Event. This field is not
editable, it will always be ‘SAMPLE’ |
|
Event Type |
This combo box lists all
possible Sample types available. These
types are editable in (Event Administration Page) |
|
Attachment |
Attach or view existing attachments by clicking the magnifying glass |
|
Browse.. |
Click on this button to
open a file browser allowing you to select a document for association. Once
selected, Click on this button to open the file. |
|
Sample Name |
The name of the
Sample. Sample name can be
automatically generated depending on configuration in the Samples and Results Administration
Screen |
|
Monitoring Point |
The Monitoring Point
where the Sample was taken. Drop down
box lists all Monitoring Points associated with this Industry |
|
Scheduled By |
Who scheduled this
sample collection? e.g., the
Authority, the Industry, or a Violation occurrence? Use this field with your
Sample if you plan to use Compliance Assistant to check Samples just for the
Industry or just for the Authority |
|
Created By |
Person who created this
event. This can be used in bigger
systems to track who is scheduling the events to be completed |
|
Assigned to |
The person who was
assigned to handle the sampling. |
|
Sampler |
The person who actually
collected the Sample |
|
Due Date |
The scheduled date for
the Sample to be taken |
|
Sample Date |
The date the Sample was
taken. Keep in mind you will also see
a Start and End date on the parameter level.
This adds flexibility to the sampling event. |
|
Analysis Completed |
Date the Sample was
analyzed by the Lab. |
|
Analysis by |
POTW personnel who
conducted testing. |
|
Late Event |
Whether or not this
Sample Event is late. If the event is
late, this will be automatically filled in by the system |
|
Has Viol |
Whether or not there are
any violations associated with this Sample.
If there are Violations, clicking this label will open the Violation window listing
all of the violations for the single sample |
|
COC Filed |
Chain
of Custody status. A check indicates
that the COC is on file with sample results. The “Auto-Check ‘COC Filed’ When
Result NA’s Gone” in Samples and Results
Administration, gives the user the option of having this checked manually
or automatically when all of the results are entered and there are no results
with NA values. |
|
Used In Avg? |
Is this Sample part of a
Sample Average? This is set
automatically by the system when averages are created. |
|
Pre Notify/Post Notify? |
Pre Notify Events are
either created on an Event Type level in the Event Administration or on the fly within any of the Events
screens (Samples Included). Pre and
Post Notify will automatically generate events before and after the original
events are due. For example, users can
create a pre-event to notify POTW personnel of an upcoming sample event. This can be used to prepare the sample
bottles and review the types of samples to take. This is available only when entering a New
sample. This is a discontinued
feature provided for backwards compatibility. Please see the Pre / Post Configuration setting. |
|
Sample Comments |
Comments about this
Sample |
|
Internal Comments |
Internal Comments about
this Sample (8000 character max). |
|
Record Selectors |
Standard Record Selectors allowing you to move between
Samples. |
|
Status Bar |
Reduced Status Bar allowing you to view a Calendar, a
Calculator, Contact Information, or create a new Phone Log Event |
|
Buttons |
Action performed |
|
New |
Create a new sample average |
|
Edit |
Allows you edit a
previously created Sample Average. |
|
Save |
Generates the averages from the samples |
|
Close |
Closes the screen.
Returns to the Sample Management screen |
|
Cancel |
Cancels the averaging and returns to the Sample Management
screen or the first sample average in the list |
|
Delete |
Deletes the Sample Average currently being displayed on
the screen |
|
AV
Results |
Quickly View the Average Results by clicking on this
button. Also you will be able to
generate violations from this screen as well. |
|
Items |
Description |
|
Industry No. |
The number of the
Industry that you are creating the Average for. This information is pulled
from the Samples Admin screen when you chose the Create Average. |
|
Industry Name |
The name of the
Industry that you are creating the Average for. This information is pulled
from the Samples Admin screen when you chose the Create Average. |
|
Sample Name |
Is an auto generated value taking into account when the
sample was made and which Industry it is for.
This name can be modified. |
|
Monitoring Point |
Choose a Monitoring Point to average the samples for. User must select a single Monitoring Point
to average, after which, a list of Existing Samples to Average will be
displayed |
|
Sample Date |
Date of the Averaged Sample that you are creating. |
|
Created By |
POTW personnel who created the sample average. |
|
Event Description |
Sample Comments (8000 character max). The number of samples being averaged is
auto-added to this field. |
|
Internal Comments |
Sample Comments to be shared only with the POTW. Not printed on NOV Letters or other public
reports. (8000 character max) |
|
Has Viol |
This field will indicate that the Sample Average you
create has a Violation. |
|
Choose Samples to Average |
Use this Sample Date list box to browse and select the
samples to be used for the average sample. Choose the Monitoring Point and
the Date of the Sample Average first. Then choose the Date range of the
samples to average. Use the Quick view
for standard date ranges. |
|
Existing Samples for
Industry |
This will list the Samples from the Date range that are
available to be used in the Average. The Add button moves the selected
sample from the Existing Samples list to the Samples Averaged side. |
|
Samples Averaged |
Displays the samples that have been selected for use in
the average sample. The Remove button takes the selected sample out of
the list and returns it to the Existing Samples list. |
|
Use Sample in Compliance |
This is an important item to be aware of!! If you choose to use the Sample Average in compliance, the samples in that average will be removed from compliance calculations. Otherwise if the check box is not checked, the samples and not the average will be used in the compliance calculations. You will see a check box on the results to indicate whether a result is used in compliance checking. |